You are in need to connect your Windows machine (be it a laptop, desktop or anything) and you don’t have another choice other than using your smartphone / wireless Wi-Fi pocket router with its limited data. Have you ever been on that situation? Or are you currently in that situation?
While connecting – or should I say tethering – your Windows machine to your smartphone or to pocket Wi-Fi router is totally fine, but don’t forget that unlike Wi-Fi connection you have at your home/office which is unlimited, normally smartphone and pocket Wi-Fi router doesn’t come with unlimited data. And that’s the reason for my writing here. To let you know how to do it (limiting) to avoid crazy expensive billings being charged to you by your telecom company.
If you are using your Windows machine over a limited internet connection, do consider to set Windows Wi-Fi connected to a Metered connection. Below I’ll show you how you can do it.
Setting Up Metered Connection on Windows Machine
The steps below are tested on Windows 10. Other version of Windows, they could appear under slightly different menu.
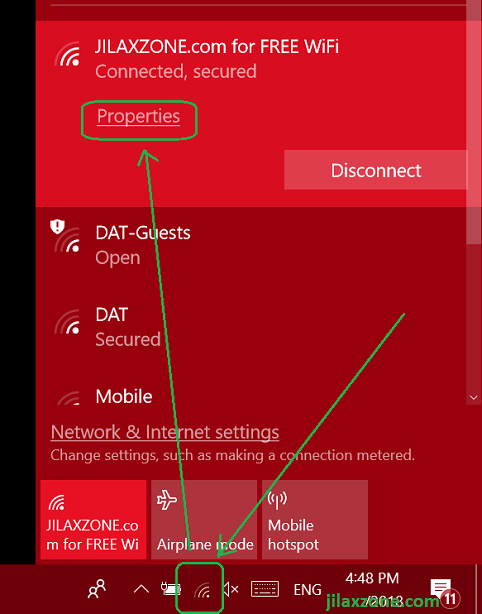
1) On Windows machine, head over to Wi-Fi settings on the taskbar (normally below), click on the Wi-Fi icon.

2) On your connected Wi-Fi, click “Properties” to open its properties page.
3) On the opened Settings page, scroll down until you find “Metered Connection”.
4) Turn “Set as Metered Connection” to ON to limit the data usage.
5) To go even further to limit the data usage, click on “Set a data limit to help control data usage on this network”.
6) You will be able to see the current data usage, setting the limit and options for background data.
7) Now, scroll down until you find “Data limit”, and click on “Set limit”.
8) On the pop-up window, choose the limit type (either monthly, one time or unlimited), and depends on your choice, choose the monthly reset date/days until data expires, choose the data limit (any numbers) and unit (GB or MB). Click “Save” once done.
For this test, I’m choosing “Monthly” as the limit type, and set “1” as the monthly reset date, and put “1 GB” as my data limit.
9) On the Data usage window, you can see the total data has been used so far and the remaining balance (if you put the data limit).
Find other awesome articles, tips, tricks related to Life and Tech, iOS and Android quick review on:
What happen when the data limit on Windows Metered Connection is reached?
Be warned: It’s still running and consuming your data!
Will the internet stop working? Turn out it’s not. Your internet will still work they way they are before. However you’ll get a pop-up, telling “You’ve reached your Wi-Fi data limit”.
What to do then, if you have reached the tethered Wi-Fi data limit and the internet is still running? Yes, you have to stop it. Otherwise likely you’ll need to pay for those extra charges.
Here’s how you can turn off your Windows Wi-Fi:
1) Go to Windows taskbar, click on the “Wi-Fi” icon.
2) Select the Wi-Fi connection you are connected to, click “Disconnect” to disconnect from it.
By right you’ll get disconnected and won’t be connected again (since you have manually disconnected it), but just in case you are worry that somehow it gets connected again to the same out-of-limit Wi-Fi, you can choose to “Forget” it, simply by doing right click on the Wi-Fi connection, then choose “Forget”. Next time you have the internet quota, you can just simply re-key-in the password.
That should be it!
Don’t make yourself be a victim of crazy costly telecom billing. Act now! Limit your tethered connection on Windows machine!
For Life, Tech tips, iOS and Android Apps and Games quick review, do visit below:
Hi, thanks for reading my article. Since you are here and if you find this article is good and helping you in anyway, help me to spread the words by sharing this article to your family, friends, acquaintances so the benefits do not just stop at you, they will also get the same goodness and benefit from it.
Thank you!

