


- This tutorial detailed the steps to create your own Anisette Server to be used on SideStore, so you won’t get your Apple ID locked.
- The process takes about 30 minutes and totally free.
- This tutorial though intended for iPhone, but works the same for iPad.
- For other interesting articles, check it out here Raspberry Pi, Linux, Windows, Xbox, PS5, Nintendo Switch, other gaming, iOS, Tech or more at JILAXZONE.
- If you find this article / content inside is already obsolete, do let me know by commenting on the comment section below so that I can update the article to reflect the latest process/news. Thanks.
This guide is made based on official guide from SideStore team which can be found here: https://wiki.sidestore.io/guides/custom-anisette.
All credits goes to SideStore team who made all these to be possible. I’m writing this detailed step by step guidelines in a very “beginner” way, so I hope everyone can follow the steps to create their own SideStore Anisette Server and URL.
If you have not installed SideStore before, do refer to the beginner guide for installing SideStore below:

Why you want to read this?
Here’s the reason why you want to read this article:
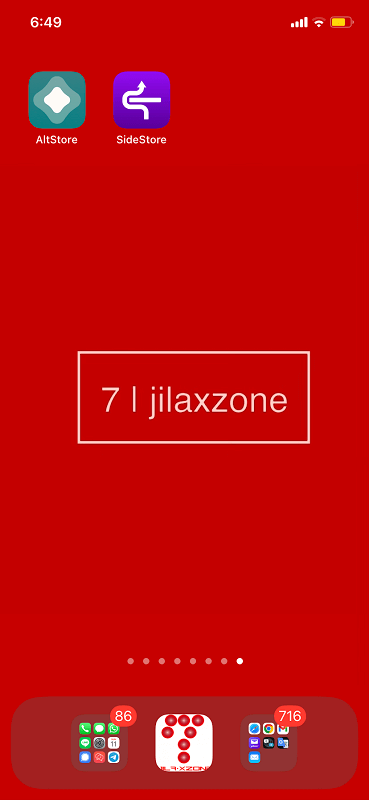
- If you like what SideStore is offering: where you don’t need to have Computer for sideloading an apps.
- And you don’t want your Apple ID account to always get locked each time sideloading an app or refreshing a sideloaded app.

Then you need to continue reading below what is Anisette URL, Server and the reason why you should create your own Anisette Server. Anyway, it’s all FREE and easy to do. Just require about half an hour of your time.
What is Anisette URL and Anisette Server?
Anisette URL is just a URL address which when you queried the URL in browser, it will return you Anisette data which is basically information used in the app signing process. Each time you are sideloading an app or refreshing a sideloaded app from your iPhone using SideStore, this Anisette data is required.
Anisette data & Anisette URL comes from a server that “act” like its a Mac. Any server returning Anisette data is called Anisette Server.
That’s the reason, unlike AltStore which are using AltServer to get this Anisette data, SideStore is using Anisette URL & Anisette Server.

The reason why you want to setup your own Anisette Server?
If you have just installed SideStore using the guidelines found here: Installing SideStore on your iPhone at JILAXZONE, and using everything default settings, most likely your Apple ID account will (now) get locked. But don’t panic!
That’s because when people are installing SideStore and use the same (default) Anisette Server that comes with the SideStore installation, it will trigger Apple security and lock the account – mainly because the same Anisette URL (which means same machine), is used by different Apple IDs and in the case of you – your Apple ID is used to login to multiple different locations (E.g.: Your real location is in South East Asia, but the Anisette Server you are using is in America).
So, to avoid your Apple ID account from getting locked in the future when using SideStore, I would highly recommend you to follow the steps below to setup your own Anisette Server.
Here’s how to create and use your own SideStore Anisette Server and URL
It’s highly recommended to do these steps on your computer.
Step 1) Register an account on Render
As suggested by SideStore team and as I had experienced it myself, using Render is one of the easiest way to create your own Anisette Server. Render is actually a service that made application deployment super easy. Even easier since it supports direct deployment from Git.
As a start, register your FREE account on Render. Skip this step if you already have account with Render.
| Link to register | https://dashboard.render.com/ |
Step 2) Create a New Web Service on Render
Once registered, on the dashboard do the following steps:

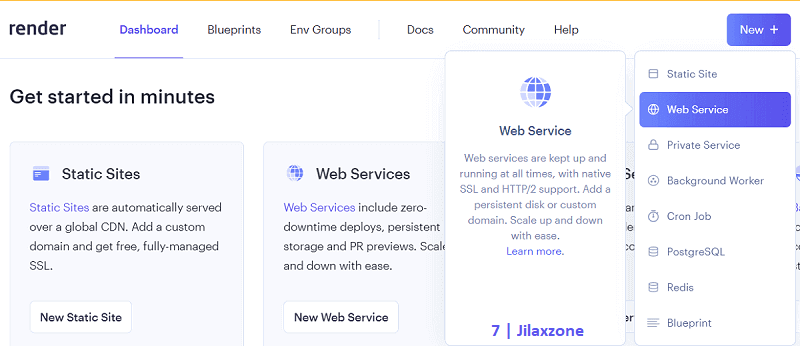
2a) Click on “New +” button.
2b) Choose “Web Service”.
You’ll then be redirected to “Create a new Web Service” page. Continue on the next step.
Step 3) Connect to the Provision Repository
Under “Create a new Web Service” page, do the following steps:
3a) Scroll down until you find “Public Git repository” section.
3b) Enter this URL, on the text box under “Public Git repository”. This is the source code for Anisette Server.
| Public Git repository | https://github.com/Dadoum/Provision.git |
3c) Click on “Continue”.
You’ll then be redirected to “You are deploying a web service for Dadoum/Provision.” page. Continue on the next step.
| If Step 3) above doesn’t work for you, do this instead: a) Download the Public Git Repository (URL above) into your local computer, by clicking on Code > Download Zip. You’ll download “Provision-main.zip”. b) Once downloaded, unzip the Provision-main.zip file. A folder called Provision-main will then be created with all the contents inside. c) Then create your own GitHub repository. Follow the steps here to create your own GitHub repo: Fix for Render throwing “There’s an error above. Please fix it to continue.” error | SideStore | Custom Anisette Server – JILAXZONE d) Once your own GitHub repo created, then upload all files under “Provision-main” folder to your new GitHub Repository. |
4) Fill in the Web Service details

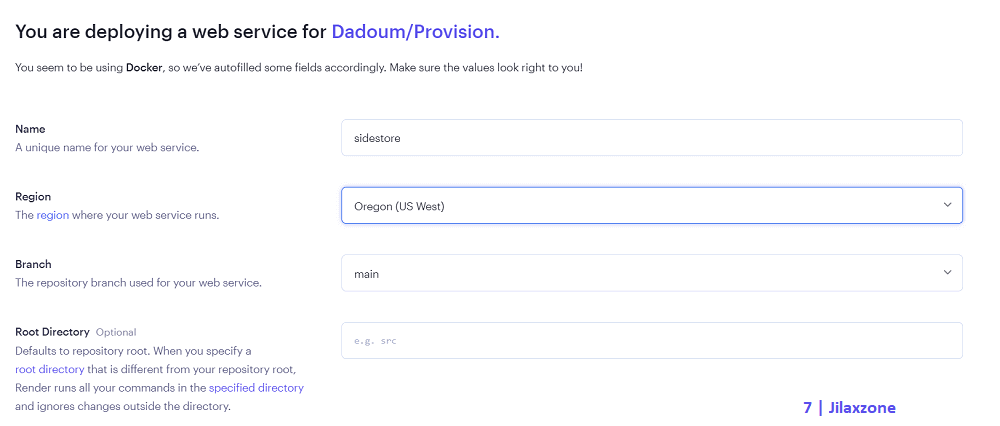
On the page, do fill in all the required details:
| Web Service Details | Remark |
|---|---|
| Name | You can fill anything you like, but highly recommended to name it something meaningful. Since you are creating your own Anisette Server for SideStore, you can give something like “sidestore-<your name>”. |
| Region | Choose one that is closest to where you live. The closer it gets, the lesser chances your Apple ID account to get locked. |
| Branch | Choose main |
| Root Directory | To leave it blank |
| Environment | To leave the default choice (Docker) |
| Instance Type | To choose FREE, however nothing stops you if you want to use the paid one. |
Once done filling in the required information, do click on “Create Web Service”.
That’s it for setting up your own Anisette Server and URL. Don’t forget, you still need to config the Anisette URL on your iPhone.

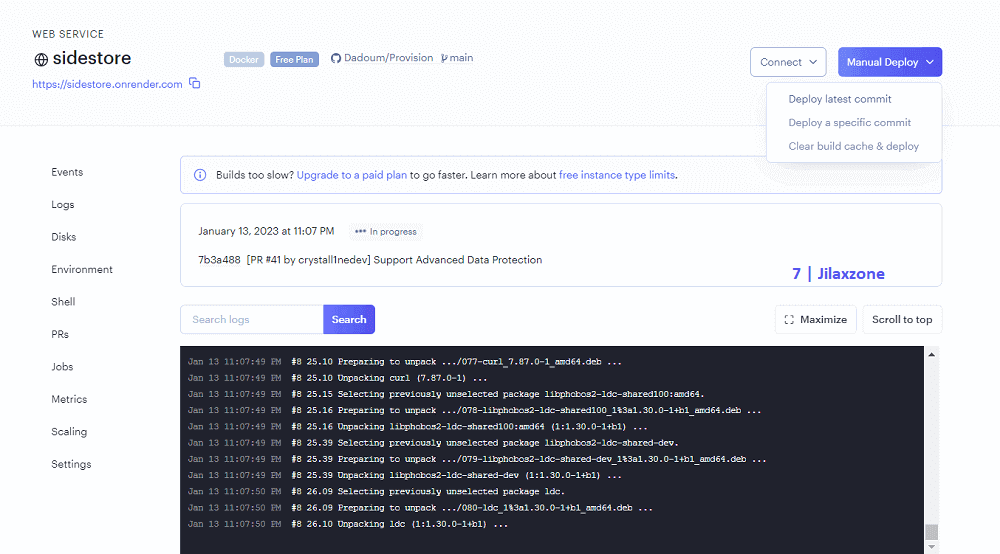
So, what you need to do now is to wait for Render to build and deploy the web service – the Anisette Server. Just in case, your build failed for whatever reasons, you can just redo the deployment by clicking on “Manual Deploy” > “Deploy latest commit”.
Once the build & deployment is done, you will see the following when it’s done: “Your service is live”.
Once the web service has been up and running, you can get your personal Anisette Server URL on the top of the Render dashboard page:
| Anisette URL | https://<your-webservice-name>.onrender.com |
Continue on the steps below.
Here’s how to configure SideStore to use your own Anisette URL
Ensure you have done the previous steps “Here’s how to create and use your own SideStore Anisette Server and URL”.
Now on your iPhone, do the following steps:
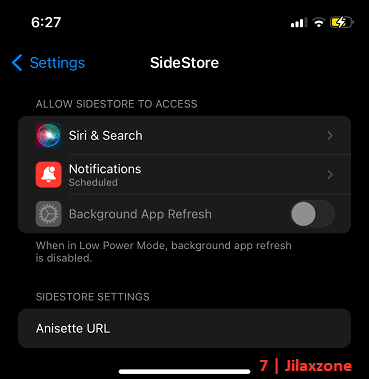
Step 1) Go to the Settings
On your iPhone, tap on Settings app.
Step 2) Find SideStore
Inside Settings, scroll down until you find SideStore and tap on SideStore to get in.
Step 3) Turn off Use Preferred servers
Inside SideStore, under DANGER ZONE, turn off “Use Preferred servers”.
Turning “Use Preferred servers” off will redirect SideStore to use Anisette URL that you key-in under “Anisette URL”.
Step 4) Key in your own Anisette URL
Inside SideStore, under DANGER ZONE, tap on “Anisette URL”, then key-in your own “Anisette URL” that you have just created on the previous steps.
That’s it. You can now quit the Settings. So next time you would like to either refresh SideStore or install a new sideloaded app or game, you just need to switch ON the VPN, then refresh / install. When SideStore prompts you for Apple ID credential, SideStore will then connect to your own Anisette URL.
Bring it all together
During my first few days using SideStore, I was super excited at the same time worried, because each time I sideloaded an app, not long after that my Apple ID always get locked. After reading here and there, I found out from the official sidestore website (sidestore.io), that the reason Apple ID getting locked was due to we are all using the same Anisette server.
So long story short, if you enjoy using SideStore but doesn’t want/would like to reduce chances of your Apple ID getting locked, then you have to create your own Anisette server.
After I created and used my own Anisette server, my Apple ID so far never get locked anymore although I keep sideloading multiple apps. In case you encountered any difficulties and/or have queries, don’t hesitate to put your queries or thoughts on the comment section down below. I’ll be happy to assist.
Do you have anything you want me to cover on my next article? Write them down on the comment section down below.
Alternatively, find more interesting topics on JILAXZONE:
JILAXZONE – Jon’s Interesting Life & Amazing eXperience ZONE.
Hi, thanks for reading my curated article. Since you are here and if you find this article is good and helping you in anyway, help me to spread the words by sharing this article to your family, friends, acquaintances so the benefits do not just stop at you, they will also get the same goodness and benefit from it.
Or if you wish, you can also buy me a coffee:


Thank you!
Live to Share. Share to Live. This blog is my life-long term project, for me to share my experiences and knowledge to the world which hopefully can be fruitful to those who read them and in the end hoping to become my life-long (passive) income.
My apologies. If you see ads appearing on this site and getting annoyed or disturb by them. As much as I want to share everything for free, unfortunately the domain and hosting used to host all these articles are not free. That’s the reason I need the ads running to offset the cost. While I won’t force you to see the ads, but it will be great and helpful if you are willing to turn off the ad-blocker while seeing this site.