Here’s how to setup and enable Captcha on WordPress website
Get plenty of spam comments?
Get plenty of login attempts to your WordPress website?
Get plenty of reset password attempts to your WordPress website?
I’ve got an easy and simple yet effective fix for you.
- This tutorial detailed the steps to setup and enable captcha on your WordPress website to better protect it from malicious spams and login / reset password attacks.
- This tutorial is intended for self-hosted WordPress website.
- For other interesting articles, do check it out here WordPress, Gaming & Games, Android, iOS, Tech or more at JILAXZONE.
- If you find this article / content inside is already obsolete, do let me know by commenting on the comment section below so that I can update the article to reflect the latest process/news. Thanks.
Being one of the widely used platform for blogging and running websites, WordPress is a soft target for spammers and attackers – bots or individuals or organizations, they are either spamming the comments sections or attacking the login or reset password page to get access into the target WordPress website. If you own or run WordPress-based website(s), you should be worried – even though the spam or attack haven’t reach your website and / or especially if those (spams or attacks) happened to you before.
One way to protect your WordPress-based website is to enable Captcha, so anyone (bots or persons) who try to either put spammy comments or attempt to login or reset the password, they’ll get blocked or restricted. In this article, I’ll show and guide you how you can set and enable captcha easily on your WordPress-based website.
Here’s how to better protect WordPress website by enabling Captcha
There are multiple ways you can enable captcha on your WordPress-based website, however the one I’m going to walk you through is the one I have tested myself, enabling captcha via Google reCaptcha service and using some available free WordPress plug-in. Steps are totally easy to be done and set, it will take about 10-15 minutes to complete the setup and secure your WordPress website. And it’s totally FREE!
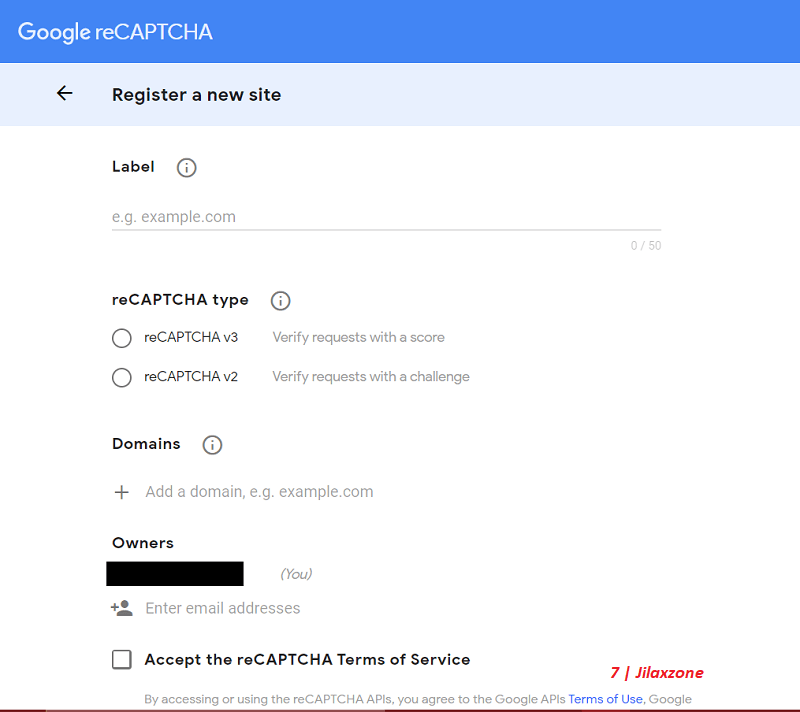
1) Open Google reCaptcha page using the link below. Login with your Google account if you haven’t logged in.
2) Key in the following details

| Details required | Explanation |
|---|---|
| Label | Put any label you like to identify the use of the captcha. My recommendation is to put your domain name as part of the label to easily identify them, especially if you have multiple domains. |
| reCaptcha type | There are 2 options: v2 and v3 (latest). Choose that more suitable for you. For my case, I choose v2 with “I’m not a robot” checkbox option, because I need anyone who login/commenting to my website to tick this box. |
| Domains | Specify your domain here. Without the http or https or www. |
| Owners | By default, your google account is already here, however if you need additional user account to maintain this captcha, then fill in the other google account. |
| Accept the reCaptcha Terms of Service | Read the Terms of Service and only if you are ok with it, then tick. However you need to agree with the terms in order to use the catpcha. |
3) Click Submit once done.
4) On the next page, you’ll be given Site Key as well as Secret Key. Copy and save your Site key and Secret key somewhere safe, you’ll need it soon later.
5) Login to your WordPress website Admin console.
6) Once logged in to WordPress Admin console, on your left menu, go to Plugins > Add New.
7) Find plugin that support reCaptcha. I used reCaptcha by BestWebSoft, however you can go and search and find anything else that suits you, as long as 1) the plugin support Google reCaptcha and 2) the plugin support your version of WordPress. I chose BestWebSoft because it’s compatible with my current version of WordPress. FYI, I have no affiliation with BestWebSoft.
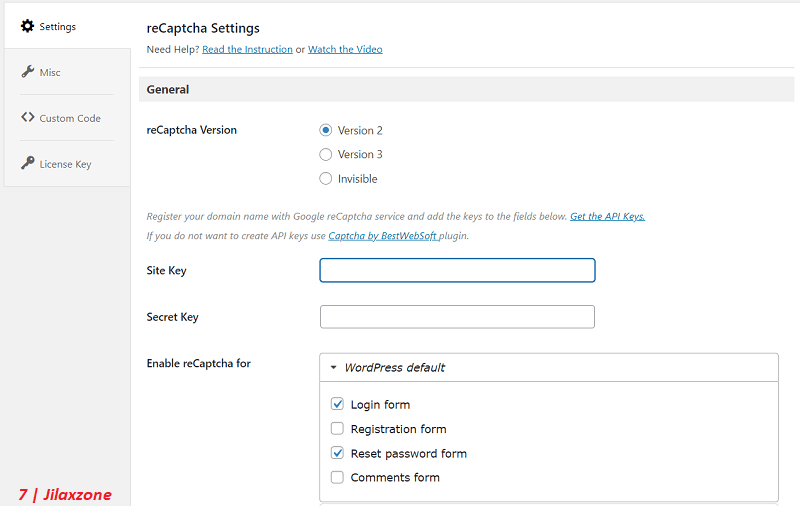
8) Depending on the plugin that you install, the menu appearing on your WordPress admin console could be different. If you are following me using reCaptcha by BestWebSoft, on WordPress menu on the left, go to reCaptcha > Settings.

9) Choose the version you are using. For my case, I configured the Google reCaptcha for v2 so I chose v2.
10) Paste your Site Key and Secret Key.
11) Set enable reCaptcha for Login form and Reset Password form (both are recommended) and Comments form (if you don’t want spam on your comment).
12) Then you can leave everything else as default settings, unless you need to change them and/or know what the entries are doing.
13) Click Save Changes.
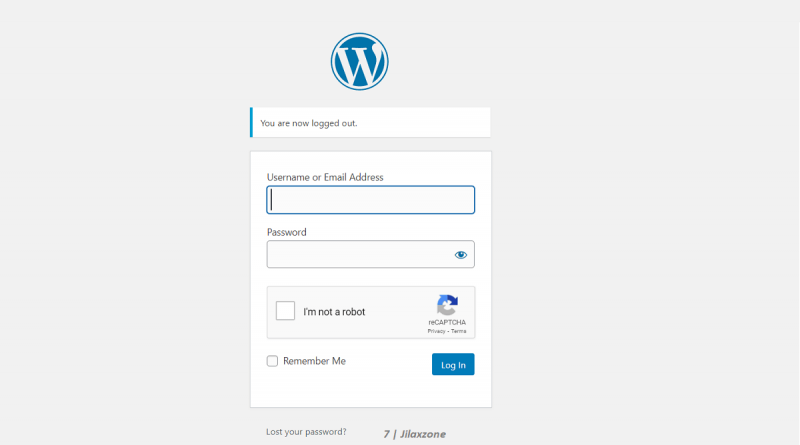
That should be it. Now to test the captcha, logout from your WordPress Admin console and go back to your login page, if you setup everything correctly, you should now see the captcha from Google.
Here’s how to check for any suspicious requests to your WordPress website
Once you have enable captcha via Google reCaptcha on your WordPress website, use the following link to check if any malicious activities trying to get access to your WordPress website:
Bring it all together
With captcha is enabled on your WordPress website, now you should now able to sleep better knowing that your WordPress website(s) are protected from those malicious activities trying to spam or get accessed to your WordPress website. If you haven’t got the time to set it up, my recommendation is you SHOUKD make the time to do it asap since attacks won’t wait for you.
In case you encounter any difficulties in any part of the setup, hit on the comment section below, I’ll be happy to help. Cheers!
Do you have anything you want me to cover on my next article? Write them down on the comment section down below.
Alternatively, find more interesting topics on JILAXZONE:
JILAXZONE – Jon’s Interesting Life & Amazing eXperience ZONE.
Hi, thanks for reading my curated article. Since you are here and if you find this article is good and helping you in anyway, help me to spread the words by sharing this article to your family, friends, acquaintances so the benefits do not just stop at you, they will also get the same goodness and benefit from it.
Or if you wish, you can also buy me a coffee:

Thank you!
Live to Share. Share to Live. This blog is my life-long term project, for me to share my experiences and knowledge to the world which hopefully can be fruitful to those who read them and in the end hoping to become my life-long (passive) income.
My apologies. If you see ads appearing on this site and getting annoyed or disturb by them. As much as I want to share everything for free, unfortunately the domain and hosting used to host all these articles are not free. That’s the reason I need the ads running to offset the cost. While I won’t force you to see the ads, but it will be great and helpful if you are willing to turn off the ad-blocker while seeing this site.


