Raspberry Pi Tip: Beginner’s guide on how to install Raspbian / Raspberry Pi OS using the easiest method – Raspberry Pi Imager
Some call it Raspbian, some call it Raspberry Pi OS, some call it Debian for Raspberry Pi or even Linux for Raspberry Pi. For easier reference throughout the rest of the article, I’m going to just call it as Raspbian.
- This article share the detail step by step to install Raspbian into Raspberry Pi so that you can have full Linux desktop experience on it.
- For other interesting articles, head to: Raspberry Pi Tips and Tricks, Android Tips & Tricks, iOS Tips & Tricks, Games, FREE games & stuffs, how-to and more at JILAXZONE.
- If you find this article / content inside is already obsolete, do let me know by commenting on the comment section below so that I can update the article to reflect the latest process/news. Thanks.
First time using Raspberry Pi and would like to install Raspbian into the Raspberry Pi? Here’s the simple yet easy to follow guide for you to install Raspbian into the Raspberry Pi.
Prerequisites
Before proceeding with the setup, here are the prerequisites you need to have and be ready for.
1) Raspberry Pi
The single-computer-board we need to make it happen.
In case you don’t have it yet. Here’s where you can get your Raspberry Pi.
| Raspberry Pi 400 |  | Get Raspberry Pi 400 on Amazon |
| Raspberry Pi 4B 8GB Starter Kit |  | Get Raspberry Pi 4B 8GB on Amazon |
| Raspberry Pi 4B 4GB |  | Get Raspberry Pi 4B 4GB on Amazon |
| Raspberry Pi 4 2GB |  | Get Raspberry Pi 4B 2GB on Amazon |
| Raspberry Pi 3B+ |  | Get Raspberry Pi 3B+ on Amazon |
2) SD Card / MicroSD Card
MicroSD Card with at least 16GB is required to install Raspbian into your Raspberry Pi. However if you plan to put many applications and do many tinkering on it, you may want to consider 32GB to 128GB instead or even more.
Check out the following recommendations for in case you are looking for MicroSD Card for your Raspberry Pi.
| Verbatim 16GB MicroSD Card |  | Verbatim 16GB on Amazon |
| Amazon Basics 64GB MicroSD Card |  | Amazon Basics 64GB on Amazon |
| SanDisk 256GB MicroSD Card |  | Sandisk Extreme 256GB on Amazon |
| SanDisk 512GB MicroSD Card |  | SanDisk 512GB on Amazon |
3) MicroSD Card Reader (Optional)
This is only required if your Computer doesn’t have MicroSD Card reader.
| MicroSD Card Adapter |  | MicroSD Card Adapter on Amazon MicroSD Card Adapter on AliExpress |
4) Other Standard Raspberry Pi accessories

Such as HDMI cable, Raspberry Pi charger, Monitor, Mouse and Keyboard – if you own a Raspberry Pi and used it before for some other fun projects, you should already have these standard Raspberry Pi accessories with you.
5) Computer
Computer is required to help do Raspbian installation into the Raspberry Pi’s MicroSD Card. Compatible Computer is either Mac, Linux or Windows.
Do ensure you get all the prerequisites ready before proceeding to the next section.
Here’s how to easily install and use Raspberry Pi OS / Raspbian on your Raspberry Pi
With all the prerequisites ready, now it’s time for the complete detailed step by step walkthrough on how you can install and use Raspbian on your Raspberry Pi. In case you have any doubts/thoughts/queries, do let me know on the comment section down below.
Step 1) Download Raspberry Pi Imager installer to your Computer.
Here’s the download link. Download according to your Computer OS.
| Windows | Raspberry Pi Imager for Windows |
| MacOS | Raspberry Pi Imager for MacOS |
| Linux | Raspberry Pi Imager for Ubuntu x86 |
The latest version of Raspberry Pi Imager as of when this article is written is version 1.7.2, so you’ll get “imager_1.7.2.exe” (for Windows) or “imager_1.7.2.dmg” (for MacOS) or “imager_1.7.2_amd64.deb” (for Linux). Depending on when you read this article, the latest version of Raspberry Pi imager you are downloading could be different.
So to make easier reference throughout the rest of this article, let me just use “Raspberry Pi Imager installation file” to refer to the installer file you have just downloaded.
Step 2) Install Raspberry Pi Imager
Once you managed to download “Raspberry Pi Imager installation file” into your Computer, double click to install it. Follow the installation wizard to get the Raspberry Pi Imager installed on your Computer.
Step 3) Plug in MicroSD Card into your Computer
Plug in your MicroSD to your Computer via the MicroSD Card slot or via the MicroSD Card reader. Ensure it’s detectable and if the MicroSD has been used for something else before, it doesn’t have any important files on them. Because the MicroSD Card will be wiped clean for Raspbian.
Do take notes on which drive the MicroSD Card is plugged into (on Windows, you can open Windows Explorer to check and see which Drive the MicroSD Card is plugged in – on my case it’s on Drive E).
Step 4) Run Raspberry Pi Imager
On Windows, press the Windows button to bring the search bar, then type “Raspberry Pi Imager”. Click on the program to start running it.
In case you are prompted with, “Do you want to allow this app to make changes to your device?”, click “Yes”.
Raspberry Pi Imager will then open and run.
Step 5) Choose OS

Click on “CHOOSE OS”. If you are using Raspberry Pi 3 onward, your device is capable of 64-bit OS, you may want to opt for “Raspberry Pi (64-bit).
However, I would recommend choosing “Raspberry Pi OS Full (32-bit)” since it comes with many recommended applications (such as Office applications).
Step 6) Choose Storage
Once you have choose the OS, now choose the storage where the Raspbian will be installed.

Click on “CHOOSE STORAGE”. If you have plugged your MicroSD Card successfully to your Computer, you should be able to see it on the list.
To ensure you are not selecting wrongly, detach any other USB / storages, plug only the MicroSD card intended for Raspbian and choose the storage.
Step 7) Installing Raspbian
Installing Raspbian to the MicroSD Card is as easy as clicking the “WRITE” button on Raspberry Pi Imager.
Depending on your Computer speed, your MicroSD writable speed and the choice of OS you made, the installation process may take 15 minutes to (worst) 1 hour. On my case it’s about 30 minutes.
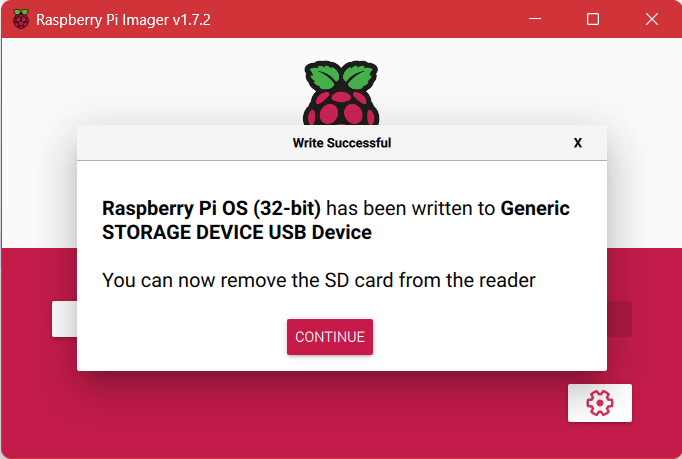
Once the Raspbian installation process to the MicroSD Card completed, you’ll get notified with “Raspberry Pi OS has been written to <Storage>. You can now remove the SD card from the reader.”.
Step 8) Plug the MicroSD Card into your Raspberry Pi

Unplug in the MicroSD from your Computer then plug it into the Raspberry Pi, together with the rest of other Raspberry Pi accessories and cables (such as Keyboard and Mouse). Before plugging in the MicroSD Card, do ensure the Raspberry Pi is in turned off position.
Step 9) Boot Raspberry Pi
Turn on the Raspberry Pi with MicroSD Card plugged in. The Raspbian splash screen will be shown after some time and the OS will boot.
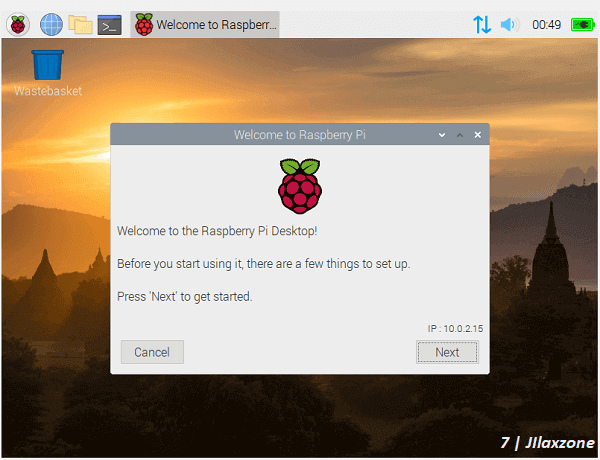
Well, that’s it. By now you should see the Raspbian booting into desktop. Now try moving your mouse or type something on your keyboard. The rest is up to you. Enjoy!
Bring it all together
Easy isn’t it? Depending on your Computer and Internet speed, but for me the whole process took about 1/2 hour and boom, my Raspberry Pi is now a Computer which I can tinker around.
Let me know in case you have any difficulties or questions around the topic, I’ll be happy to assist.
Interested to see other tips and tricks? Check them out on the links below.
Raspberry Pi: Raspberry Pi Tips & Tricks at JILAXZONE.
Android: Android Tips & Tricks at JILAXZONE.
iPhone and iOS: iPhone and iOS tips and tricks at JILAXZONE.
Do you have anything you want me to cover on my next article? Write them down on the comment section down below.
Alternatively, find more interesting topics on JILAXZONE:
JILAXZONE – Jon’s Interesting Life & Amazing eXperience ZONE.
Hi, thanks for reading my curated article. Since you are here and if you find this article is good and helping you in anyway, help me to spread the words by sharing this article to your family, friends, acquaintances so the benefits do not just stop at you, they will also get the same goodness and benefit from it.
Or if you wish, you can also buy me a coffee:

Thank you!
Live to Share. Share to Live. This blog is my life-long term project, for me to share my experiences and knowledge to the world which hopefully can be fruitful to those who read them and in the end hoping to become my life-long (passive) income.
My apologies. If you see ads appearing on this site and getting annoyed or disturb by them. As much as I want to share everything for free, unfortunately the domain and hosting used to host all these articles are not free. That’s the reason I need the ads running to offset the cost. While I won’t force you to see the ads, but it will be great and helpful if you are willing to turn off the ad-blocker while seeing this site.