
Here’s how to enable JIT on iPhone running iOS 17 and up via Windows PC
The same method is also applicable for iPad running iPadOS 17 and up.
- This guide shares the steps how you can enable JIT using Windows PC on your iPhone running iOS 17 (and up).
- This tutorial though intended for iPhone, but works the same for iPad.
- For other interesting articles, check it out here Raspberry Pi, Linux, Windows, Xbox, PS5, Nintendo Switch, other gaming, iOS, Tech or more at JILAXZONE.
- If you find this article / content inside is already obsolete, do let me know by commenting on the comment section below so that I can update the article to reflect the latest process/news. Thanks.
After a while, finally there’s a pretty good way to enable JIT on iPhone and iPad running iOS 17 or iPadOS 17 via Windows. Thanks to fritzlb and team as he’s the one writing all the scripts found below in this article and the original author of the steps. What I’m doing here, is to expand the tutorial and make it much easier for anyone to understand and successfully execute them. The end goal is to enable JIT on your iPhone and iPad so that you can run / play anything that you like with the superior performance coming out from your device.
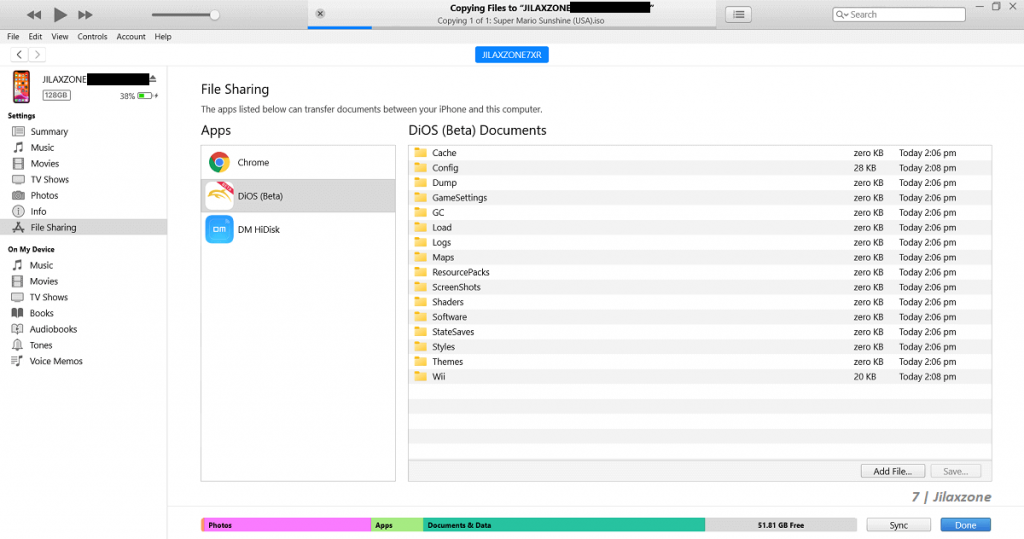
For easier reference, in this tutorial, I’ll be using DolphiniOS for sample. You can freely using other sideloaded apps that you like. For those who doesn’t know DolphiniOS, it’s basically a fork from Dolphin – a Nintendo GameCube and Nintendo Wii emulator – which requires JIT to optimally run and play games. For tutorial installing DolphiniOS, you can refer on this link: Here’s how to play Nintendo Gamecube & Wii games on iPhone – works with the latest iOS at JILAXZONE.
Here’s what you need
Before begin, these are what you need to enable JIT on your iPhone via Windows PC.
- Your iPhone / iPad running iOS 17 or up.
- Windows PC
- Notepad++ (Notepad is fine if you don’t have and don’t want to install Notepad++)
- Data Cable (Lightning or USB-C)
- Your time ~1/2 hour to 1 hour depending on your Internet speed and PC speed.
These are simple steps how to enable JIT on iPhone running iOS 17 and up via Windows PC
| The steps written here are tested on: a) Latest iOS – at the time this article is written is iOS 17 Public Beta (17.5.1) and using the iPhone that I currently have – iPhone XR. In case you are not on iOS 17 or iPadOS 17 yet, check the link here to get iOS 17 & iPadOS 17: Here’s how to update iPhone to iOS 17 today (iPad included!) at JILAXZONE. b) Latest Windows – at the time this article is written is Windows 11 Pro Insider Review Build 26085. In you are also using Windows and would like to install Windows 11, check the link here to get them installed: Getting Windows 11 and installing on your Computer at JILAXZONE. Should you are using different version of iOS or iPadOS and / or different version of Windows, the steps may be slightly different but should not deviate too much. Anyway, in case you have questions / issues, feel free to put them down on the comment section down below, I’ll be more than happy to help you. |
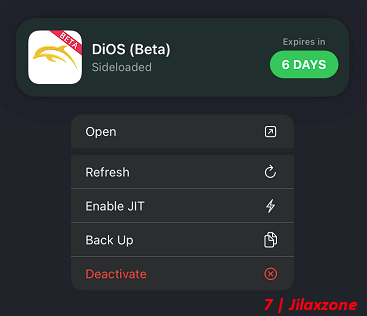
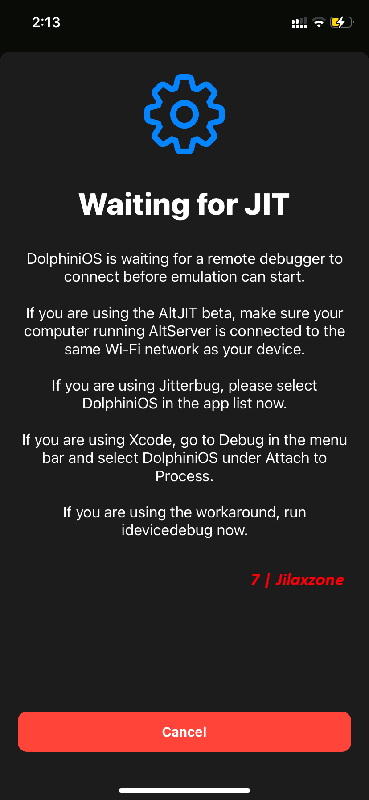
Unfortunately, since iOS 17, Apple has changed how JIT can be enabled, hence the above screenshot – enabling JIT just by holding to the sideloaded app then tap on “Enable JIT” is only working on iOS 16 and before. For iOS 17, you have to do the steps mentioned below.
The tutorial is split into 3 main sections.
Section 1: One Time Steps.
Section 2: To do for each and every Sideloaded apps that require JIT.
Section 3: Recurring Steps every time you need to enable JIT and run the sideloaded app.
Once you do steps on Section 1 and Section 2, steps on Section 3 – which is what you need to do/redo every time you want to run sideloaded app that requires JIT, is super simple and easy to do.
Section 1: One Time Steps
Section 1 covers one-time steps, from step 1 to step 6. Once you have done time one time, you don’t need to do them again anymore.
Step 1) Download Python
This step is to be done on your Windows PC. Python is used to run the script to push the developer image into your iPhone. Check out the link below to download python to your PC.
Step 2) Install Python
Once you have downloaded the Python, double click the installer file to start installing Python. Choose custom installation and ensure to tick “Add Python to environment variables”. Click “Next” and follow the remaining steps to get the Python installed on your Windows PC.
Step 3) Test Python Installation
Once Python is installed on your Windows PC, run the following steps to test and confirm the Python is indeed installed on your machine.
Open Command Prompt (Click on Windows button and type “CMD”). Once Command Prompt is opened and run, and type pip and press Enter.
If you are seeing the following message, means Python has been installed successfully on your machine.
| Usage: pip <command> [options] |
Step 4) Download iOS17-JIT-WIN
Download iOS17-JIT-WIN package, this is the core technology that would eventually enabled JIT on your iPhone.
Once GitHub is opened, inside iOS17-JIT-WIN GitHub page, go to “Code” and click on “Download ZIP”. iOS17-JIT-WIN-main.zip file will be downloaded into your Windows PC.
Step 5) Extract iOS17-JIT-WIN-main.zip
Once the zip is downloaded, extract it and put it under the folder of your choice. (For easier reference, this is the folder I’ll be using on the remaining tutorial – E.g.: D:\Programs\iOS17-JIT-WIN-main)
Step 6) Install iOS17-JIT-WIN
Open Windows Explorer then navigate to iOS17-JIT-WIN-main extracted folder (E.g.: D:\Programs\iOS17-JIT-WIN-main).
Open Command Prompt (Click on Windows button and type “CMD”). Run Command Prompt as Administrator (Right click on Command Prompt, then choose “Run as Administrator”) then navigate to iOS17-JIT-WIN-main extracted folder (E.g.: D:\Programs\iOS17-JIT-WIN-main), by typing:
| D: cd : D:\Programs\iOS17-JIT-WIN-main |
Then when you already are inside the iOS17-JIT-WIN-main extracted folder (E.g.: D:\Programs\iOS17-JIT-WIN-main), type the following to start iOS17-JIT-WIN component installation:
| install.bat |
When prompted by User Account Control, click on “Yes”. It will then start installing pymobiledevice3 and its related libraries.
When asked to reboot your PC, do reboot.
Section 2: To do for each and every Sideloaded apps that require JIT
Section 2 covers one-time steps that you need to do for each and every sideloaded apps, from step 7 to step 9. Once you have done time one time for each sideloaded app, you don’t need to do them again anymore.
Step 7) Take Note on Sideloaded App ID
Every App ID is unique, so you have to get it directly from your own device, don’t and can’t use the one you find from Internet.
Open SideStore/AltStore, tap on “My Apps”, then tap on “View App IDs”.
If you have not installed SideStore/AltStore, follow these steps here to get it installed.
| SideStore (Recommended) | Steps to install SideStore on iPhone at JILAXZONE |
| AltStore | Steps to install AltStore on iPhone at JILAXZONE |
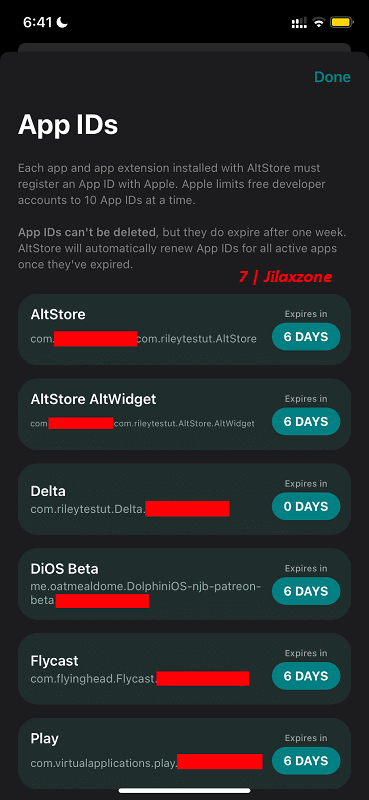
Under App IDs screen, you should see all the sideloaded apps installed on your iPhone. App ID is what you see under each sideloaded app, typically (but not necessarily) start with “com.aaaa.bbbb.cccc”. (As example, the App ID for DolphiniOS is me.oatmealdome.DolpiniOS-njb-patreon-beta.XXXXXXXXXX where XXXXXXXXXX represents unique ID of your device – hence my App ID must be different with your App ID).
Take note on the App ID of the sideloaded app you want to enable JIT for.
Step 8) Make a copy of “open terminal here.bat”
Make a copy of “open terminal here.bat” (Press Ctrl+C on “open terminal here.bat”, then press Ctrl+V, you should then see “open terminal here – Copy.bat”).
Then on the “open terminal here – Copy.bat”, do right click and click on “Rename”.
Rename “open terminal here – Copy.bat” into your <your sideloaded app>.bat (E.g.: DolphiniOS.bat).
Step 9) Make your own launcher bat for each sideloaded app
Open the <your sideloaded app>.bat (E.g.: DolphiniOS.bat).) using Notepad++ (if you don’t have Notepad++, using Notepad is also ok).
Then at the bottom of the content, add the following command:
| python jit_enabler_better.py <App ID> |
Replace <App ID> with the actual App ID you get from previous steps. (E.g.: python jit_enabler_better.py me.oatmealdome.DolpiniOS-njb-patreon-beta.XXXXXXXXXX)
Section 3: Recurring Steps every time you need to enable JIT and run the sideloaded app
Section 3 covers the recurring steps that you need to do every time you want to launch, run or play with your sideloaded app that requires JIT to run. Steps need to do is step 10 and step 11.
Step 10) Plug your iPhone into Windows PC
Plug your data cable – be it Lightning cable or USB-C cable – into your Windows PC and into your iPhone. Ensure your iPhone gets detected by the Windows PC.
Step 11) Run the launcher <your sideloaded app>.bat
Once plugged in and connected, double click <your sideloaded app>.bat (E.g.: DolphiniOS.bat)
If this is the first time you are doing this, you’ll get prompted 2 times on your Windows PC and 1 time on your iPhone.
On your PC, if you are prompted to install Tencent WeTest Universal Serial Bus, click “Install”.
On your PC, if you are prompted to install Tencent WeTest Network adapters, click “Install”.
On your iPhone, if you are prompted to Trust This Computer, tap on “Trust”.
You will then see on the Command Prompt window, “This may take a few minutes” message.
Just wait until you see “Done” on the Command Prompt window. Check your iPhone, the sideloaded app should have been opened and run with JIT.

That’s it. Done.
Bring it all together
Though the steps seemed complicated, but in reality, they are not. In fact, thanks to fritzlb and his team and contributors, all need to be done are download, configure, click and tap. In case you encountered any difficulties and/or have queries, don’t hesitate to put your queries or thoughts on the comment section down below. I’ll be happy to assist.
On my own testing running DolphiniOS using JIT method shared above, I can get consistent 60fps for Mario Kart Double Dash!! while getting 30 fps for Super Mario Sunshine (I believe this is capped by the game itself). So, the method is indeed working.
Do you have anything you want me to cover on my next article? Write them down on the comment section down below.
Alternatively, find more interesting topics on JILAXZONE:
JILAXZONE – Jon’s Interesting Life & Amazing eXperience ZONE.
Hi, thanks for reading my curated article. Since you are here and if you find this article is good and helping you in anyway, help me to spread the words by sharing this article to your family, friends, acquaintances so the benefits do not just stop at you, they will also get the same goodness and benefit from it.
Or if you wish, you can also buy me a coffee:

Thank you!
Live to Share. Share to Live. This blog is my life-long term project, for me to share my experiences and knowledge to the world which hopefully can be fruitful to those who read them and in the end hoping to become my life-long (passive) income.
My apologies. If you see ads appearing on this site and getting annoyed or disturb by them. As much as I want to share everything for free, unfortunately the domain and hosting used to host all these articles are not free. That’s the reason I need the ads running to offset the cost. While I won’t force you to see the ads, but it will be great and helpful if you are willing to turn off the ad-blocker while seeing this site.


Also, a video of doing all the steps in order (using dolphinios as the example), would be incredibly helpful.