Beginner’s guide to Install and Setup Batocera on Raspberry Pi
Works for all models of Raspberry Pi (At least at the time this article is written).
- This article share the detail step by step to install Batocera on Raspberry Pi so that you can play retro games on it.
- For other interesting articles, head to: Raspberry Pi Tips and Tricks, Android Tips & Tricks, iOS Tips & Tricks, Games, FREE games & stuffs, how-to and more at JILAXZONE.
- If you find this article / content inside is already obsolete, do let me know by commenting on the comment section below so that I can update the article to reflect the latest process/news. Thanks.
What is Batocera?
In short, Batocera or also known as Batocera.linux is an open-source and completely free lightweight Linux OS that’s heavily modified and stripped down for the purpose solely for retro-gaming and entertainment, it has a gamer-and-controller-friendly user interface that can boot just from a USB Stick / SD card.
Batocera compatibles with the following game console (but not limited to):
- 3DO
- Amiga
- Amstrad CPC
- MAME
- Neo Geo: MVS, Pocket, Pocket Color
- Nintendo NES, SNES, N64, GameCube, Wii, Game Boy, Game Boy Color, Game Boy Advance, DS, 3DS
- OpenBOR
- SEGA: SG1000, Master System, Genesis / Mega Drive, Sega CD, Sega 32x, Saturn, Dreamcast, Game Gear
- Sony PlayStation: PS1, PS2 and P3
- And many more.
What I wrote above is not complete exhaustive list. For full Batocera compatibility, head on to the official Batocera compatibility list: Retro game console full compatibility list on Batocera.
Reasons why you want to install Batocera on Raspberry Pi

Raspberry Pi is the single-computer-board that’s small enough to be carried around anywhere you go. Installing Batocera on Raspberry Pi means you have access to your retro games practically anywhere and anytime – so long you can find any monitor and / or TV, you can just plug your Raspberry Pi into the monitor and TV and you are ready to play!
Prerequisites
Before proceeding with the setup, here are the prerequisites you need to have and be ready for.
1) Raspberry Pi
The single-computer-board we need to make it happen.
In case you don’t have it yet. Here’s where you can get your Raspberry Pi.
| Raspberry Pi 400 |  | Get Raspberry Pi 400 on Amazon |
| Raspberry Pi 4B 8GB Starter Kit |  | Get Raspberry Pi 4B 8GB on Amazon |
| Raspberry Pi 4B 4GB |  | Get Raspberry Pi 4B 4GB on Amazon |
| Raspberry Pi 4 2GB |  | Get Raspberry Pi 4B 2GB on Amazon |
| Raspberry Pi 3B+ |  | Get Raspberry Pi 3B+ on Amazon |
2) SD Card / MicroSD Card
MicroSD Card with at least 16GB is required to install Batocera into your Raspberry Pi. However if you plan to put many games on it, you may want to consider 32GB to 128GB instead or even more.
Check out the following recommendations for in case you are looking for MicroSD Card for your Raspberry Pi.
| Verbatim 16GB MicroSD Card |  | Verbatim 16GB on Amazon |
| Amazon Basics 64GB MicroSD Card |  | Amazon Basics 64GB on Amazon |
| SanDisk 256GB MicroSD Card |  | Sandisk Extreme 256GB on Amazon |
| SanDisk 512GB MicroSD Card |  | SanDisk 512GB on Amazon |
3) MicroSD Card Reader (Optional)
This is only required if your Computer doesn’t have MicroSD Card reader.
| MicroSD Card Adapter |  | MicroSD Card Adapter on Amazon MicroSD Card Adapter on AliExpress |
4) Controllers
Batocera for Raspberry Pi works straight-away with wired and wireless controllers. So pick the best controller for your retro-gaming parties!
In case you need recommendations, here they are:
| PowerA Xbox Wired USB Controller |  | Looking for cheap-yet-studry wired controller? This the controller you are looking for to play on Batocera running on Raspberry Pi. Get PowerA Xbox Wired Controller on Amazon |
| 8BitDo SN30 USB Controller |  | This 8BitDo SN30 wired controller works out-of-the box with Batocera running on Raspberry Pi. Get 8BitDo SN30 Wired Controller on Amazon |
| N64 USB Controller |  | Looking for something nostalgic? Get this N64-shaped USB controller that works great with Batocera running on Raspberry Pi. Get N64 USB Controller on Amazon |
| Xbox Series X|S Wireless Controller |  | Great controller from Xbox compatible with your Xbox (of course!) as well as Windows PC, Android, iOS, Nintendo Switch (via Mission Control) and Batocera running on Raspberry Pi, recommended for those with big hands. Read here for pairing Xbox Series X|S Controller with your iPhone at JILAXZONE. In case you need it: Get Xbox Series X|S Wireless Controller on Amazon Get Xbox Series X|S iPhone Clipper on AliExpress |
| PS5 DualSense |  | Awesome controller from PlayStation compatible with your PS5 (of course!) as well as Android, iOS, Nintendo Switch (via Mission Control) and Batocera running on Raspberry Pi, recommended for those with smaller hands. Read here for pairing PS5 DualSense Controller with your iPhone at JILAXZONE. In case you need it: Get PS5 DualSense on Amazon Get PS5 DualSense iPhone Clipper on AliExpress |
| PS4 DualShock |  | While DualSense is the latest PlayStation controller, but doesn’t mean DualShock 4 is bad. DualShock 4 is indeed one of the cheaper alternative to get into gaming on your Android, iOS, Nintendo Switch (via Mission Control) and Batocera running on Raspberry Pi, recommended for those with smaller hands. In case you need it: Get PS4 DualShock 4 on Amazon Get PS4 DualShock 4 on AliExpress Get PS4 DualShock 4 iPhone Clipper on AliExpress |
| Xbox One Wireless Controller |  | This is the previous generation of Xbox Controller. Although previous generation, it’s still a great controller to use with your Xbox One (of course!) as well as Windows PC, Android, iOS, Nintendo Switch (via Mission Control) and Batocera running on Raspberry Pi. This controller is recommended for those with big hands. The main controller appeal is the fact that it’s much cheaper than the Xbox Series X|S wireless controller. In case you need it: Get Xbox One Controller on Amazon Get Xbox One Controller on AliExpress Get Xbox One iPhone Clipper on AliExpress |
| iPega 9083S |  | Telescopic controller that’s value for money. Not only it compatibles with PC and Android, it also compatible with Nintendo Switch and Batocera running on Raspberry Pi. Use Bluetooth to connect. In case you need it: Get iPega 9083S on Amazon Get iPega 9093S on AliExpress Check it out here to see iPega 9083S in action: YouTube link |
| 8BitDo SN30 |  | This 8BitDo SN30 wireless controller works out-of-the box with Batocera running on Raspberry Pi. Get 8BitDo SN30 on Amazon Get 8BitDo SN30 on AliExpress |
5) Other Standard Raspberry Pi accessories
Such as HDMI cable, Raspberry Pi charger, Keyboard – if you own a Raspberry Pi and used it before for some other fun projects, you should already have these standard Raspberry Pi accessories with you. Keyboard is only required if somehow your Controller is not detectable by Batocera.
6) Computer
Computer is required to help do flashing Batocera image into the Raspberry Pi’s MicroSD Card. Either Mac, Linux or Windows.
Here’s how you can install and setup Batocera on Raspberry Pi
There are lots of ways to get Batocera up and running, including detail and thorough setup on each and every retro game console, however what I’m sharing here is the simplest, easiest way to get Batocera up and running on your Raspberry Pi.
The overall exercise took about 30-60 minutes, depending on your Internet speed (for downloading all the required software) and on your host machine (for flashing and booting up Batocera).
| The steps written here are tested on: 1) PC running Windows 11. PC is used to flash Batocera into Raspberry Pi’s MicroSD Card. 2) Batocera version 33. 3) Raspberry Pi 1 B+. Should you are using different version of Raspberry Pi, Batocera and / or Computer OS, the steps may be slightly different but should not deviate too much. Anyway, in case you have questions / issues, feel free to put them down on the comment section down below, I’ll be more than happy to help you. |
Step 1) Download Batocera Image File nto your Computer.
The latest Batocera as of when this article is written is version 33. However depending on your Raspberry Pi model, the version can vary. Since you may use different Raspberry Pi model and may download a different version, if you happen to see this guide sometime in the coming future, for easier reference, let’s just call the Batocera Image file as Batocera-rpi.img.gz.

| Raspberry Pi model | Download link |
|---|---|
| Raspberry Pi Zero | Pi Zero Download link at Batocera |
| Raspberry Pi Zero 2 | Pi Zero 2 Download link at Batocera |
| Raspberry Pi A/A+ | Pi A/A+ Download link at Batocera |
| Raspberry Pi B/B+ | Pi B/B+ Download link at Batocera |
| Raspberry Pi 2B | Pi 2B Download link at Batocera |
| Raspberry Pi 3A+ | Pi 3A+ Download link at Batocera |
| Raspberry Pi 3B/B+ | Pi 3B/B+ Download link at Batocera |
| Raspberry Pi CM3/CM3+ | Pi CM3/CM3+ Download link at Batocera |
| Raspberry Pi 4B | Pi 4B Download link at Batocera |
| Raspberry Pi 400 | Pi 400 Download link at Batocera |
| Other Raspberry Pi models | Other Pi Download link at Batocera |
Step 2) Download and install Balena Etcher into your Computer

For simplicity, I would recommend to download the portable one. At the time this article is written, the latest Balena Etcher portable is version 1.7.7, so when I downloaded it, I got balenaEtcher-Portable-1.7.7.exe. Size 123MB. Since you may download a different version if you do this in the coming future, let’s just call the installer as BalenaEtcherPortable.exe.
| Download link | https://www.balena.io/etcher/ |
Step 3) Plug in the MicroSD Card
Plug in your MicroSD to your Computer via the MicroSD Card slot or via the MicroSD Card reader. Ensure it’s detectable and doesn’t have any important files on them. Because the MicroSD Card will be wiped clean for Batocera.
Step 4) Run Balena Etcher on your Computer & Start Flashing
Once Batocera downloaded successfully, run BalenaEtcherPortable.exe as Administrator, by right clicking on the BalenaEtcherPortable.exe then select “Run as Administrator”.
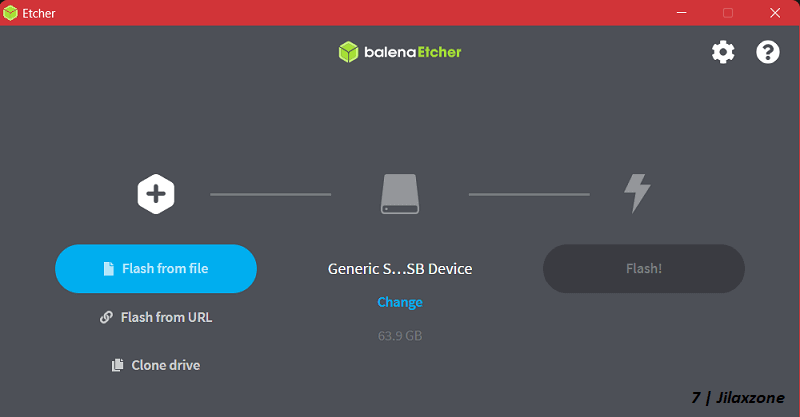
Once Balena Etcher is running, follow these steps:
4a) On the left side, click “Flash from Drive”, select the Batocera-rpi.img.gz you have just downloaded.
4b) On the middle of the screen, click “Change” to select the MicroSD Card you want to flash the Batocera into.
4c) Then on the right side, click “Flash” to start flashing.
| In case flashing is failed, change the following settings on your Computer: i) Go to Windows > Start > Settings > Privacy & Security > Windows Security > Virus & Threat Protection. ii) Inside Virus & Threat Protection window, scroll down to find “Ransomware protection”, click “Manage ransomware protection”. iii) Inside Ransomware Protection window, under “Controlled Folder Access”, click on “Allow an app through Controlled folder access”. iv) Inside Allow an app through Controlled folder access window, click on “+ Add an allowed app”. v) Find BalenaEtcherPortable.exe (E.g.: balenaEtcher-Portable-1.7.7.exe). vi) Once BalenaEtcherPortable.exe has been added to the list, redo the flashing steps. |
Depending on the computer specs you are using to flash the Batocera, the flashing (and validating) process can take from 10-30 minutes.
Once flashing completed, you can safely unplug the MicroSD Card containing Batocera. Let’s just call it Batocera MicroSD Card on the rest of this article.
Step 5) Plug in Batocera MicroSD Card into Raspberry Pi

Plug in the Batocera MicroSD Card into the Raspberry Pi. Ensure the Raspberry Pi is in turned off position, before you plug in the Batocera MicroSD Card.
Step 6) Boot Raspberry Pi with Batocera MicroSD Card plugged in
Turn on the Raspberry Pi with Batocera MicroSD Card plugged in. The Batocera splash screen will be shown after some time and Batocera will boot.
Step 7) Plug in your Controller(s)
If it’s a wired controller, plug the wired controller into one of the Raspberry Pi USB port. The controller will be auto-detected by Batocera.
If it’s a wireless controller, plug in keyboard into one of the Raspberry Pi USB port. Then follow these steps:

7a) Press Spacebar to open Main Menu.
7b) Navigate to Controller Settings > Pair a Bluetooth Controller.
7c) Batocera will show “Scanning Bluetooth. Seaching controllers..”.
7d) Depending on wireless controller you are using, activate the controller into pairing mode. Typically the LED light in the controller will start flashing when you successfully set the controller in pairing mode.
Wait for Batocera to recognize your Controller. When the wireless controller connected successfully, you’ll see the message on screen “<your controller> connected”.
Once your wireless controller connected to Batocera, you can safely unplugged your Keyboard.

Time for some retro gaming and entertainment!
Bring it all together
There you go. With the simple-yet-detailed steps above, you should be able to get Batocera booted up and run from your Raspberry Pi. In case you encounter any difficulties or have any queries, feel free to shout them on the comment section down below. I’ll be happy to assist.
Interested to see other tips and tricks? Check them out on the links below.
Raspberry Pi: Raspberry Pi Tips & Tricks at JILAXZONE.
Android: Android Tips & Tricks at JILAXZONE.
iPhone and iOS: iPhone and iOS tips and tricks at JILAXZONE.
Do you have anything you want me to cover on my next article? Write them down on the comment section down below.
Alternatively, find more interesting topics on JILAXZONE:
JILAXZONE – Jon’s Interesting Life & Amazing eXperience ZONE.
Hi, thanks for reading my curated article. Since you are here and if you find this article is good and helping you in anyway, help me to spread the words by sharing this article to your family, friends, acquaintances so the benefits do not just stop at you, they will also get the same goodness and benefit from it.
Or if you wish, you can also buy me a coffee:

Thank you!
Live to Share. Share to Live. This blog is my life-long term project, for me to share my experiences and knowledge to the world which hopefully can be fruitful to those who read them and in the end hoping to become my life-long (passive) income.
My apologies. If you see ads appearing on this site and getting annoyed or disturb by them. As much as I want to share everything for free, unfortunately the domain and hosting used to host all these articles are not free. That’s the reason I need the ads running to offset the cost. While I won’t force you to see the ads, but it will be great and helpful if you are willing to turn off the ad-blocker while seeing this site.