iPhone: Here’s how to change iOS 16 Stack notifications back to old one (List-based notifications)
- This article shared how you can change back iPhone notification back to the old list mode.
- For other interesting articles, head to: iOS Tip & Trick, Games, FREE games & stuffs, how-to and more at JILAXZONE.
- If you find this article / content inside is already obsolete, do let me know by commenting on the comment section below so that I can update the article to reflect the latest process/news. Thanks.
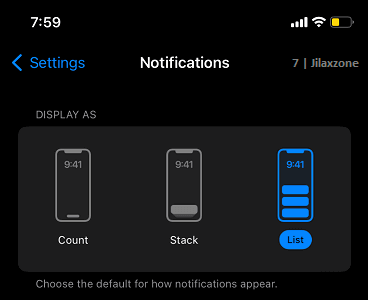
Have been using iOS 16 for quite some time but doesn’t really like how the new “Stack” notifications looks like on the iPhone lock screen? There’s an easy way to change that. But before going into the details, let me share what are the available settings for Notifications on iOS 16. They are:
Count: View just the number of notifications.
Stack: View the notifications grouped into stacks by app.
List: View the notifications in a list.
Here’s how to change iOS 16 Stack Notification back to List
Follow these simple steps to change your iPhone Stack Notification to List-based notification.
1) On your iPhone, go to Settings > Notifications.

2) Inside Notifications screen, tap List.
3) Close the Settings.
When you get your next notifications, it will be shown like how it was being shown on previous iOS: list model. Whichever notification comes earlier, it will be at the bottom while the latest notification will appear on top and they are shown
Bring it all together
With the tip shared above, now you can change back the notification like how it was used to be. In case you encountered any difficulties and/or have queries, don’t hesitate to put your queries or thoughts on the comment section down below. I’ll be happy to assist.

Interested to see other iPhone and iOS tips and tricks? Check them out here: iPhone and iOS tips and tricks at JILAXZONE.
Do you have anything you want me to cover on my next article? Write them down on the comment section down below.
Alternatively, find more interesting topics on JILAXZONE:
JILAXZONE – Jon’s Interesting Life & Amazing eXperience ZONE.
Hi, thanks for reading my curated article. Since you are here and if you find this article is good and helping you in anyway, help me to spread the words by sharing this article to your family, friends, acquaintances so the benefits do not just stop at you, they will also get the same goodness and benefit from it.
Or if you wish, you can also buy me a coffee:

Thank you!
Live to Share. Share to Live. This blog is my life-long term project, for me to share my experiences and knowledge to the world which hopefully can be fruitful to those who read them and in the end hoping to become my life-long (passive) income.
My apologies. If you see ads appearing on this site and getting annoyed or disturb by them. As much as I want to share everything for free, unfortunately the domain and hosting used to host all these articles are not free. That’s the reason I need the ads running to offset the cost. While I won’t force you to see the ads, but it will be great and helpful if you are willing to turn off the ad-blocker while seeing this site.


