How to Play Super Mario Galaxy on Dolphin emulator | Emulating WiiMote and Nunchuck
- This guide will get you to play Super Mario Galaxy using controller, emulating Wiimote and Nunchuck.
- Using this setup, you can do Mario’s Spin as well as Pull Star on Super Mario Galaxy.
- Though intended for Super Mario Galaxy, it should also works for Super Mario Galaxy 2 and bunch of other Wii titles.
- Feel free to reach me in case you need help on the setup, do leave your queries on comment section down below.
Another Dolphin-related articles from me. If you come across to this article, that means you are trying to play Super Mario Galaxy Nintendo Wii game on Dolphin emulator without any of these: the original Wiimote (Wii Remote), Nunchuck or the sensor bar.
This article will show exactly how you can play the game with only controller or keyboard (in my case, I’m using a Bluetooth controller and to be honest, I haven’t tried it with a keyboard – but it should works too).
Here’s the steps on how to play Super Mario Galaxy using Dolphin with just a controller.
I can share you my controller config here (jump to the bottom of this article to get the download link for my controller config that works with Super Mario Galaxy), but just in case your controller isn’t compatible with my settings, here I shall detailed them.
The same setup below should also works for Dolphin on Android or DolphiniOS for iOS.
Pre-requisites
1) Ensure you are using the latest Dolphin emulator. Head to Dolphin emulator download page here: https://dolphin-emu.org/download. Or in case you have Dolphin installed already, you can navigate to Help > Check for Updates to ensure you are using the latest Dolphin.
2) Ensure you have Super Mario Galaxy disc/iso/rom already with you.
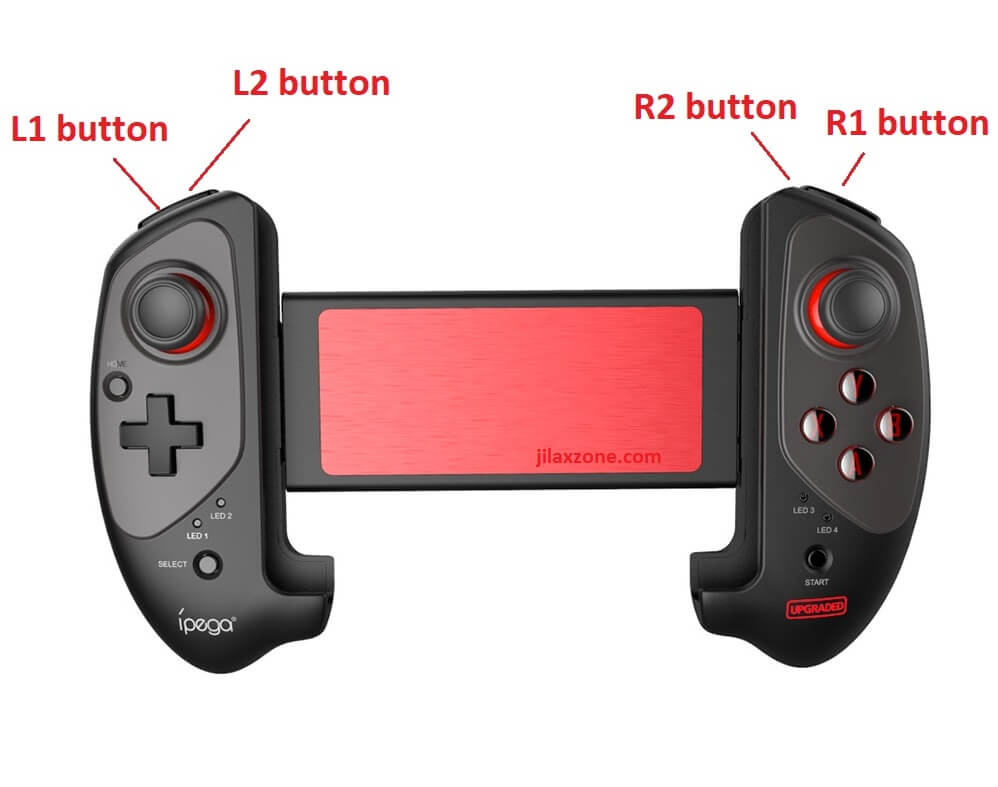
3) Ensure you have paired the controller and ready to use for Dolphin. A Bluetooth controller (like image above) with 4 face buttons, 4 shoulder buttons, 2 analog sticks (with L3 and R3) and select and start button is highly recommended – since we are going to emulate Wiimote, Nunchuk and their motion control.
This is my setup.
I am using iPega 9083 bluetooth controller paired to a PC. It has all the buttons I needed to emulate Wiimote and Nunchuck. For you case, you can use any other type of controller – so long it has all the required buttons mentioned before.
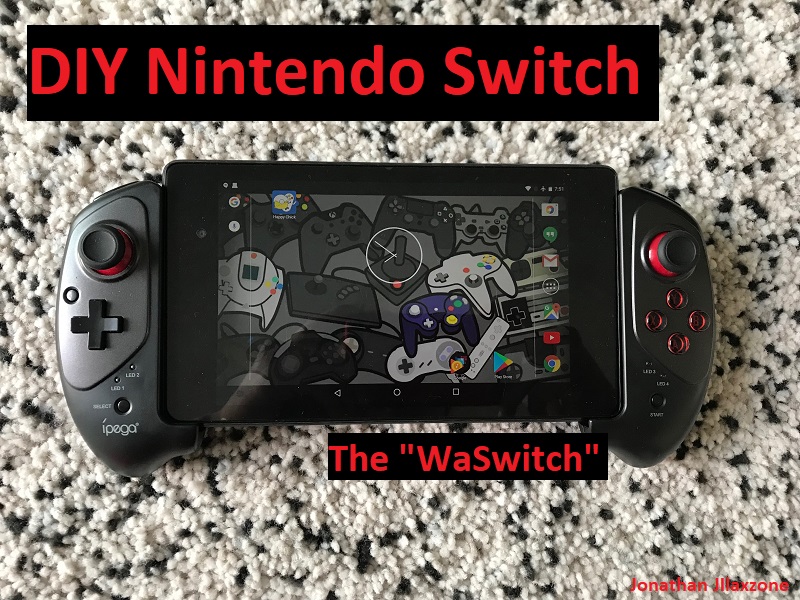
In case you are interested with the same controller I use, here’s link to get it.
On Amazon:
Alternative link: iPega 9083 Amazon link.
On AliExpress:
 IPEGA 9083
Alternative link: iPega 9083 AliExpress link.
See the controllers in action.
Note: If you buy anything using any of the links above, I will earn a small commission at no extra cost charged on your purchases.
Configure Dolphin emulator to play Super Mario Galaxy
The setup is actually pretty easy, as long as you know how the real Wii controllers work and apply them into the emulated controller.
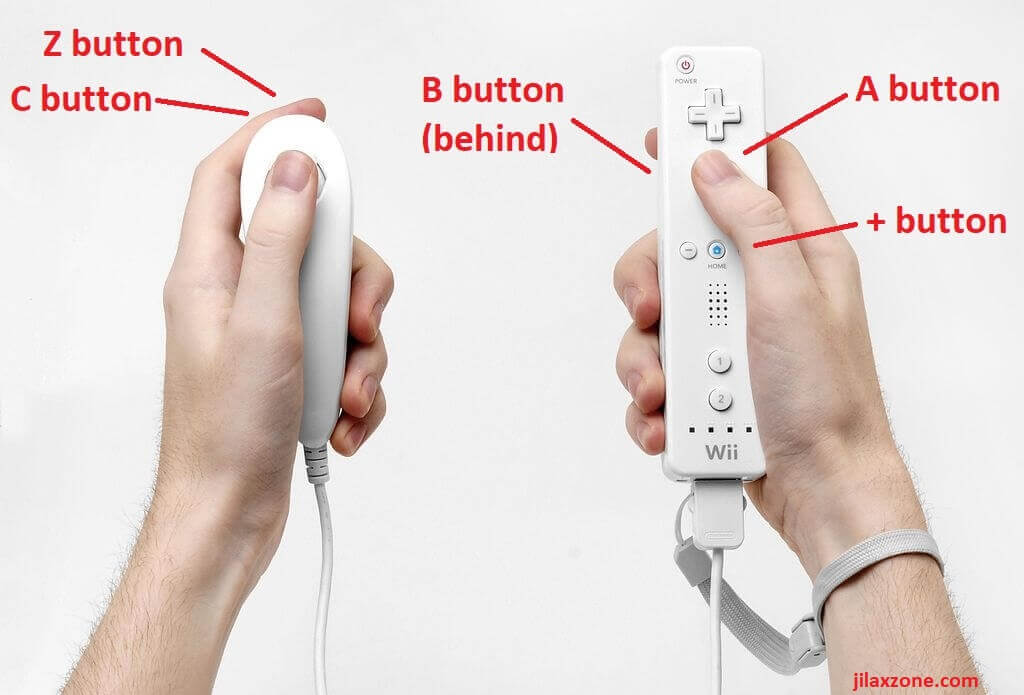
A real Wii controllers used for playing Super Mario Galaxy consist of a WiiMote on your right hand and a Nunchuck on your left hand.
Rather than imagining it, here’s the real Nintendo Wii controllers: A Nunchuck on the left hand and a Wiimote on the right hand and their buttons.
1) Run Dolphin emulator.

Article continues below.
Popular on JILAXZONE today:
2) Go to Controller section.
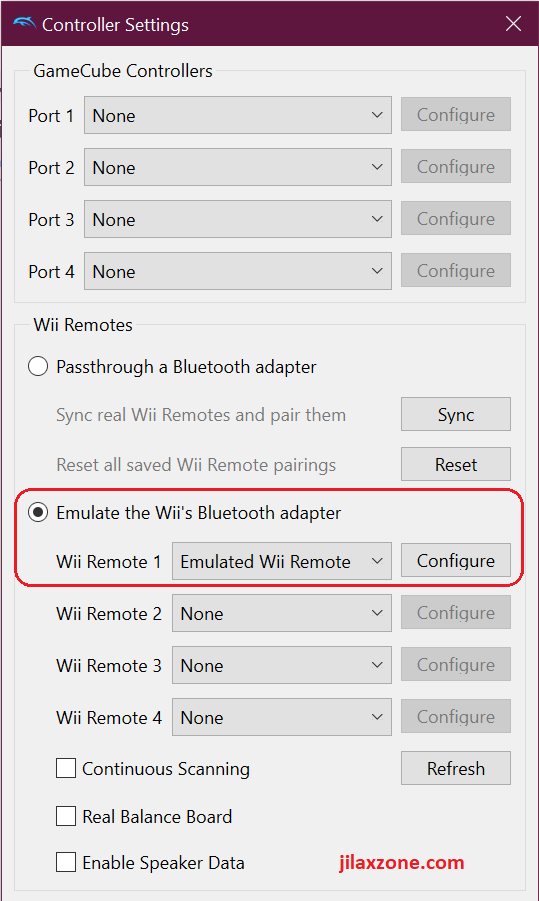
3) Under the Wii Remotes section, click on “Emulate the Wii’s Bluetooth adapter” then on Wii Remote 1, choose “Emulated Wii Remote”. Click Configure.
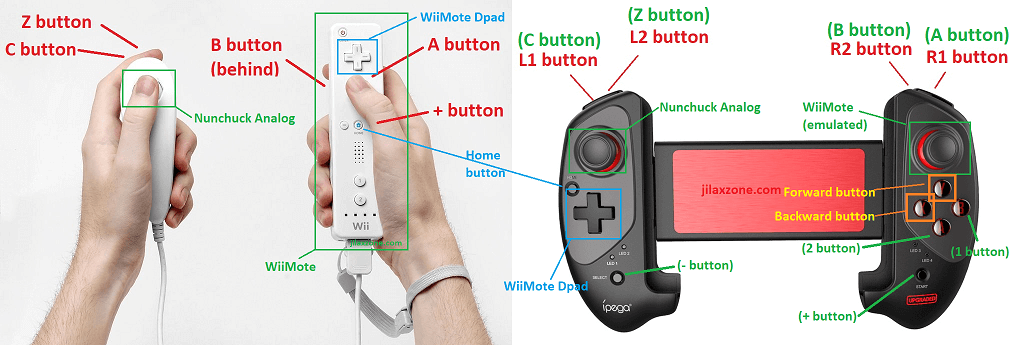
If you don’t want all the hassle, skip the next step on download the config file. But if you want to know how I set it up and in case my config file doesn’t work for you, here’s the steps. Refer to the image below for easier understanding and setup. That’s what basically I’m going to do. To map both Nunchuck and Wiimote into a single controller. The whole Wiimote movement shall be emulated with the right analog stick.
For all the setup below, always refer to this “mapping image”:
The basics:
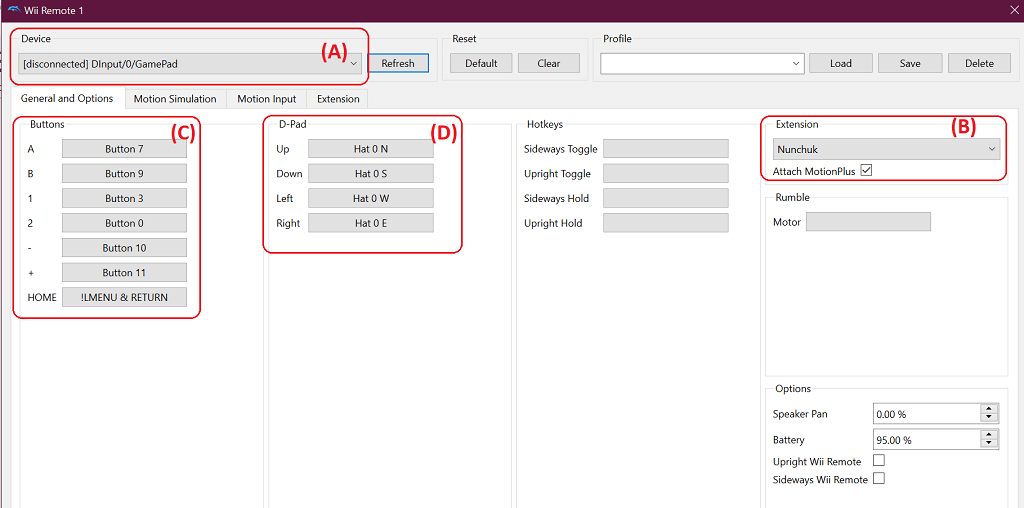
4) Before proceeding, ensure you have seen the comparison between the real Wii controllers with a controller (refer to “mapping image” above) and seen the Dolphin Wii Remote setup configuration screen. To make it easier, I split into 4 different areas: A, B, C and D as indicated on image above.
Section A) Ensure you have selected the correct controller.
Section B) Ensure you have chosen Nunchuck as the extension. “Attach MotionPlus is optional, you can tick it or left it un-ticked (recommend to left it ticked).
Section C) It’s the front face buttons on the WiiMote. Refer to my image above (showing Wii controllers mapped to a controller). Set the WiiMote A, B, 1, 2, + and – button.
Section D) It’s the WiiMote DPad. Refer to my image above (showing Wii controllers mapped to a controller) to set the WiiMote DPad button accordingly.
Emulating Wiimote:
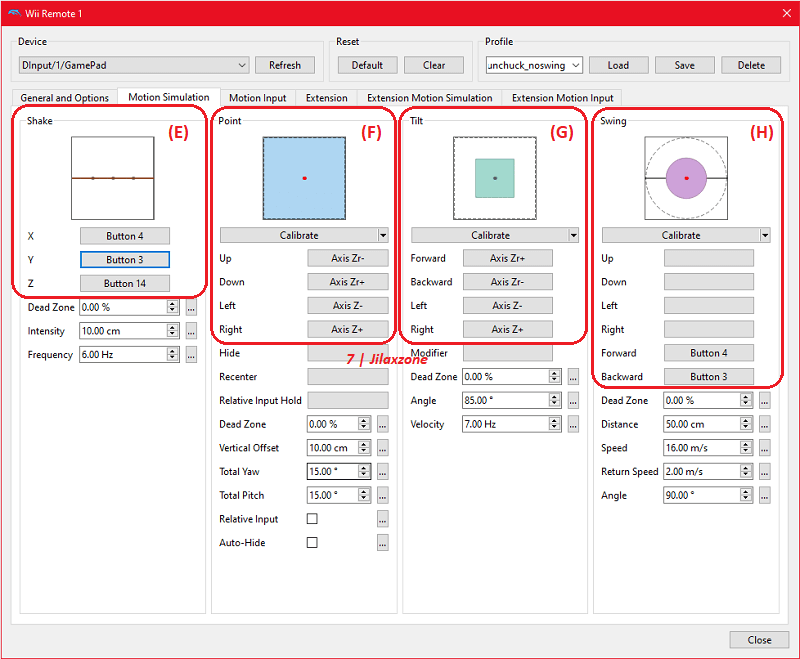
5) This is the most important section and steps. Go to Motion Simulation tab. This is where the Wiimote motion is emulated, setup and configured. Refer to “Dolphin emulator Wiimote configuration screen for Super Mario Galaxy” image above.
Section E) Shake section is to setup the Wiimote shake ability. Mario in Super Mario Galaxy has the ability to spin to stun enemies as well as to jump to another galaxies. So simulate this using the R3 button for Z, then use Forward button for X and Backward button for Y (refer to “mapping image” above for Forward and Backward buttons).
Section F) Point section is to setup the Wiimote pointing capability. Normally you do pointing by Wiimote only when you are moving the cursor to collect Star bits or to shoot the Star bits. So simulate this using the right analog stick on the controller. Map Up button with Right analog stick Up, Down button with Right analog stick Down, then left and right with Right analog stick left and right.
Section G) Tilt section is to setup the Wiimote tilting capability. Simulate this using the right analog stick on the controller. Things to note here, the setup has to be inverted. When you tilt forward, it’s like when you push the right analog stick down. When you tilt backward, it’s like when you push the right analog stick up. Left tilt to be mapped to right analog stick left and so does right tilt to be mapped to right analog stick right.
Section H) Swing section is to setup the Wiimote swinging capability. Since Super Mario Galaxy doesn’t require swinging, this section can be left blank. However, do setup the forward button and backward button as seen on the “mapping image” above.
6) (Optional) Go to Extension Motion Simulation tab. This is where the Wiimote MotionPlus is emulated, setup and configured. Repeat the setup from Motion Simulation (step 5, section E, G and H), since they are the same.
Emulating Nunchuck:
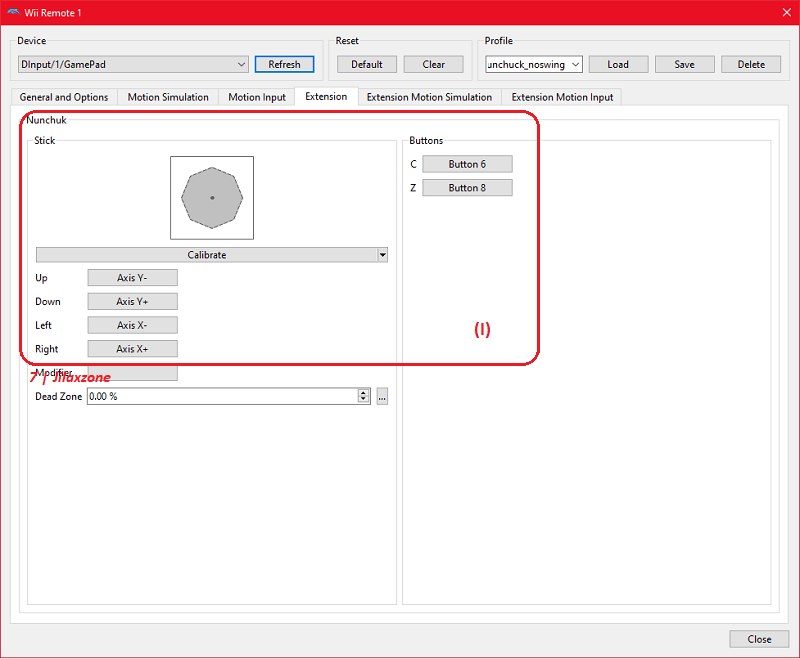
7) Next step is to go to Extension tab. Refer to “Dolphin emulator Nunchuck configuration screen for Super Mario Galaxy” image above, what needed to be setup here is the stick and buttons section, the rest you can leave it default.
Section I) This is Wii Nunchuck settings. Set the Nunchuck analog stick as well as the C and Z buttons. Using Left analog stick, map up, down, left and right accordingly to Left analog stick up, down, left and right. Then map Nunchuck’s C button to L1, Nunchuck’s Z button to L2 (refer to “mapping image” for details in case you get confused).
8) Finally, DO NOT forget to save your hard work. Save the configuration you have just done by clicking on the Save button.
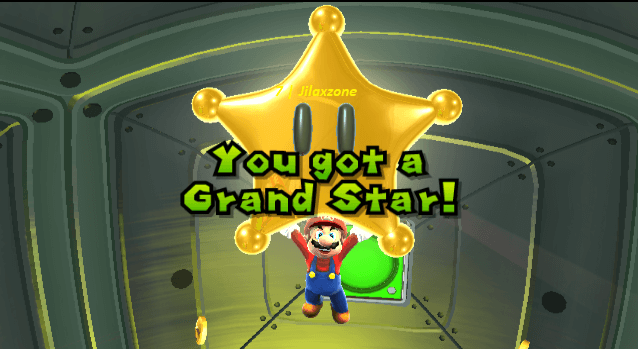
Dolphin Wii Emulator Controller Config for Super Mario Galaxy
Download the config here.
Super Mario Galaxy Controller config: Google Drive.
Once downloaded, if you are using Windows, put the config profile here.
C:\Users\<your ID>\Documents\Dolphin Emulator\Config\Profiles\Wiimote.
Change <your ID> to your Windows user.
Things to note: I’m using a Bluetooth Controller iPega 9083 (as seen on image above). In case you are using different controller model, the config may not be straight-away working for you. You may need to do some adjustment to it.
Bring it all together
Well, I wish I can explain it in a lot simpler way, but I can’t. That’s how I setup my controller to work with Dolphin to enable me to play Super Mario Galaxy and I couldn’t be more happy than this.
In case you have questions, don’t hesitate to drop them on the comment section below. I’ll try my best to help you out.
Do you have anything you want me to cover on my next article? Write them down on the comment section down below.
Alternatively, find more interesting topics on JILAXZONE:
JILAXZONE – Jon’s Interesting Life & Amazing eXperience ZONE.
Hi, thanks for reading my curated article. Since you are here and if you find this article is good and helping you in anyway, help me to spread the words by sharing this article to your family, friends, acquaintances so the benefits do not just stop at you, they will also get the same goodness and benefit from it.
Or if you wish, you can also buy me a coffee:

Thank you!
Live to Share. Share to Live. This blog is my life-long term project, for me to share my experiences and knowledge to the world which hopefully can be fruitful to those who read them and in the end hoping to become my life-long (passive) income.
My apologies. If you see ads appearing on this site and getting annoyed or disturb by them. As much as I want to share everything for free, unfortunately the domain and hosting used to host all these articles are not free. That’s the reason I need the ads running to offset the cost. While I won’t force you to see the ads, but it will be great and helpful if you are willing to turn off the ad-blocker while seeing this site.


Thanks so much Jonathan, you rule! From all the crap uncomplete and confusing videos and tutorials that wasted my time this that you publish is right on spot! I have Ipega 9157 and everything works like a charm…
Hi Duke,
Glad the tutorial can help you.
Hello, is it possible to map A and B buttons on face buttons and not on R1/R2 (i use ps4 controller, so for example Mario can jump with X)
Hi raffaele,
Yes, that’s totally possible. Just play around with the controller configuration.
Hello! I did everything like described but the cursor is moving much to fast so I can’t select anything. Any help?
Hi Martha,
In any case you have a Nintendo Switch JoyCon with you, you can use them on Dolphin. The Joycon can simulate Nintendo Wii’s Nunchuck and Wiimote better.
Check out here: https://jilaxzone.com/2021/04/01/how-to-use-nintendo-switch-joy-con-on-dolphin-emulator-emulating-wiimote-nunchuck-and-motionplus/
In case you don’t have, you have to really move it very slowly so that you can select what you want to select.