Beginner’s guide to install Raspberry Pi OS on VM inside your Computer
Simulating Raspberry Pi on your existing Computer. No purchase of actual Raspberry Pi hardware required.
Either Raspberry Pi is out of stock or it’s getting much more expensive or you are not sure yet whether Raspberry Pi is really for you? Whichever the reason you have with you, you can make use of this simple step by step tutorial to get your hands and eyes to experience Raspberry Pi inside your Computer by running the Raspberry OS as a VM inside your Computer. You can test out pretty much everything related to the software, such as install a media server, write and test python codes and such. On hardware-related testing, such as making Raspberry Pi as external router, or making Raspberry Pi as retro gaming console – your results may vary – due to limitation and the fact that it’s running inside a VM.
Note: VM refers to Virtual Machine.

- This article shares the simple guide how you can easily setup Raspberry Pi OS on your Computer running as a Virtual Machine.
- For other interesting articles, head to: Raspberry Pi tips and tricks, Batocera tips and tricks, Nintendo, PlayStation, Xbox, Games, FREE games & stuffs, how-to and more at JILAXZONE.
- If you find this article / content inside is already obsolete, do let me know by commenting on the comment section below so that I can update the article to reflect the latest process/news. Thanks.
Steps to install Raspberry Pi OS as VM on Computer
| The steps written here are tested on: 1) PC running Windows 11. PC is used to host the Raspberry Pi OS Virtual Machine. On the rest of the article, I will just mention this as “Computer”. 2) Raspberry Pi OS for Desktop. Kernel version: 4.19. Debian version: 10 (buster). Should you are using different version of Raspberry Pi OS for Desktop and / or different version of Computer OS, the steps may be slightly different but should not deviate too much. Anyway, in case you have questions / issues, feel free to put them down on the comment section down below, I’ll be more than happy to help you. |
Follow these steps to get your Raspberry Pi OS up and running inside your Computer.
Note: All these steps are done on your Computer.
Step 1) Download and install VirtualBox
VirtualBox is one of the software that enables Computer to run Virtual machine. It’s free and open source. We are going to use VirtualBox to host the Raspberry Pi OS inside a VM.
1a) Open the Download link
| Download link | https://www.virtualbox.org/wiki/Downloads |
1b) Under “platform packages”, find the download binary for your Computer.
1c) Once downloaded, find the VirtualBox installer file and install it. Follow the instruction on the installer.
Step 2) Download Raspberry Pi OS for Desktop use.
This is the OS used by Raspberry Pi. However the version I shared here has been optimized for use in the actual Computer.
2a) Open the download link
2b) Find: Raspberry Pi Desktop
2c) Click the “Download” button. The version I’m downloading at the time this article is written is 2.9GB (Kernel version: 4.19. Debian version: 10 (buster)).
Depending on when you see this article, your Raspberry Pi Desktop version and download file name could be different from mine. At the time this article is written, the Raspberry Pi OS Desktop file name is “2021-01-11-raspios-buster-i386.iso”. For the sake of simplicity, let’s just call it as “Raspberry Pi Desktop ISO file” on the rest of this article.
The “Raspberry Pi Desktop ISO file” will then be downloaded to your Computer under the download folder you choose. Again, for the sake of simplicity – since my Computer download folder could be totally different from your Computer download folder, on the rest of the article, let’s just call this download folder as “Raspberry Pi Desktop Download folder” (typically located on C:\users\<your_user_name>\Downloads).
Step 3) Create New Virtual Machine Raspberry Pi OS VM
At this stage, you have downloaded and install VirtualBox, you have also downloaded the “Raspberry Pi Desktop ISO file”.
3a) Run VirtualBox. On your Computer, click Windows Start button and type “VirtualBox” and press “Enter”.
3b) Inside VirtualBox, click “New” button. A prompt “Create Virtual Machine” will appear.
3c) Inside the “Create Virtual Machine” prompt, fill them in with these:
| Name | RaspberryPiDesktop |
| Machine folder | D:\VM (you can customize this setting) |
| Type | Linux |
| Version | Other Linux (64-bit) |
3d) Click “Next”.
On the rest of this article, I would use “RaspberryPiDesktop” to refer to the Raspberry Pi VM I’m creating.
Step 4) Set the amount of RAM
Next step is to set the amount of RAM for the Raspberry Pi OS. I would suggest to follow the amount of RAM of Raspberry Pi you are trying to get.
| Item | Minimum | Recommended |
|---|---|---|
| RAM requirement | 1GB | 4GB |
Since I have Windows machine with 24GB, so I’ll go with 8GB options (I would like to simulate the feel of Raspberry Pi 4 8GB).
Click “Next”.
Step 5) Set the hard disk.
Next step is to create the hard disk. You’ll be prompted to setup hard disk.
5a) Select “Create a virtual hard disk now”.
5b) Click “Create”.
Step 6) Choose the Hard Disk Type.
Next step is to choose the hard disk type for your Virtual Machine.
6a) Use the default option, select “VDI – VirtualBox Disk Image”.
6b) Click “Next”.
Step 7) Select Size of hard disk
7a) Select “Dynamically allocated”.
7b) Click “Next”.
Article continues below.
Popular on JILAXZONE today:
Step 8) Set hard disk name and max limit for hard disk
I would suggest to follow the amount of storage you will get if you are buying the actual Raspberry Pi hardware.
You can leave the name as default “RaspberryPiDesktop.vdi”. However on the max limit for hard disk size, follow this guideline:
| Item | Minimum | Recommended |
|---|---|---|
| Hard Disk Max Limit Size | 8GB | 32GB |
Click “Create”.
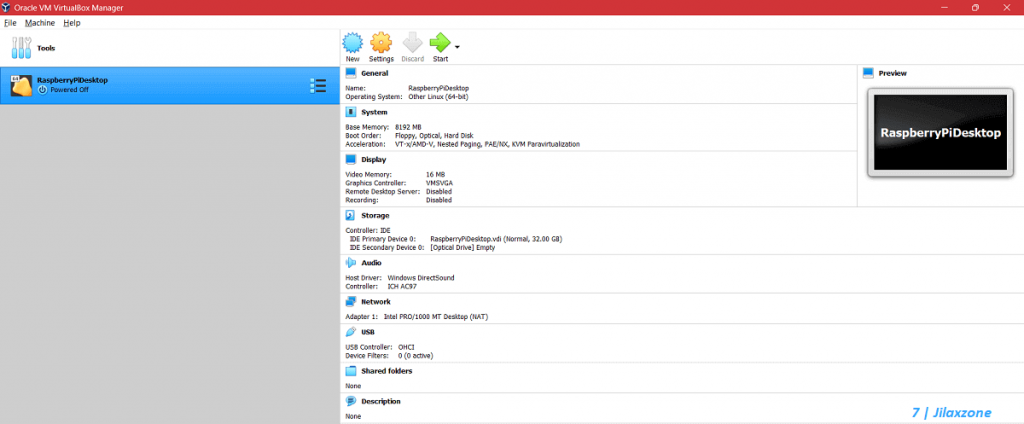
At this stage, your Raspberry Pi VM has been successfully created, however it’s still totally blank with no Raspberry Pi OS installed yet.
Step 9) Mount the ISO to “RaspberryPiDesktop” VM Optical Drive.
9a) On your Virtual Box, select the Raspberry Pi VM you have just created.
9b) Click on “Settings”. This will open your RaspberryPiDesktop VM settings.
9c) Inside RaspberryPiDesktop settings window, navigate to Storage and select the Disc “Empty” icon.
9d) Then on the right side of the window, click the “Disc” icon and select “Choose a disk file”. A file explorer window will then pop-up.
9f) Navigate to “Raspberry Pi Desktop Download folder” (typically located on C:\users\<your_user_name>\Downloads), find and select the “Raspberry Pi Desktop ISO file” (At the time this article is written, the “Raspberry Pi Desktop ISO file” name is “2021-01-11-raspios-buster-i386.iso”). Then click “Open”.
You should now see the Disc “Empty” icon turned into Disc with your “Raspberry Pi Desktop ISO file”. You just mounted the “Raspberry Pi Desktop ISO file” into your RaspberryPiDesktop VM. Click “OK” to close the RaspberryPiDesktop VM settings.
Step 10) Start “RaspberryPiDesktop” VM for the first time.
Once you have mounted the “Raspberry Pi Desktop ISO file” into your RaspberryPiDesktop VM. Now click on “-> Start” to start your RaspberryPiDesktop VM for the first time.
Step 11) Graphically Install Raspberry Pi OS to “RaspberryPiDesktop”
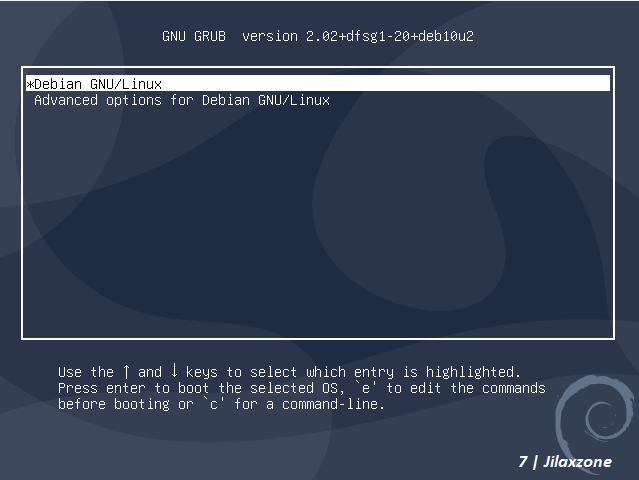
Once the RaspberryPiDesktop VM started, it will show the Debian GNU/Linux menu (BIOS mode).
11a) Select “Graphical install” and press “Enter”.
If you are not seeing “Debian” but instead black screen with “Kernel Panic” written, ensure:
- You have enable Virtualization ON from your BIOS
- You have enable VT-X or AMD
This link will surely help: VirtualBox Kernel Panic solution on Reddit.
11b) However, if you are seeing “Debian”, then proceed to the next step.
Step 12) Configure Raspberry Pi OS installation
12a) Configure the keyboard. I would recommend choose the default: “British English”. Click “Continue”. Installer will load the required files from the optical drive (CD-ROM)
12b) On Partition disk screen, select “Guided – use entire disk”. Click “Continue”. Select the available hard disk (there should be only 1). Click “Continue”.
12c) On the next Partition disk screen, select “All files in one partition (Recommended for new users)”. Click “Continue”.
12d) On the next Partition disk screen, select “Finish partitioning and write changes to disk”. Click “Continue”. Then on the next screen, select “Yes”. Click “Continue”. The installation will then begin. Depending on your Computer specs, the installation could take approximately 5-15 minutes. So what you can do now is wait.
12e) On the GRUB boot loader screen, asking to install GRUB bootloader on a hard disk, select “Yes”. Click “Continue”.
12f) On the next GRUB boot loader screen, choose “/dev/sda”. Click “Continue”. Installation will then continue.
After another few minutes (1-5 minutes), you’ll be shown with “Installation complete” message. Click “Continue”. The installer will remove the unrequired files, then reboot the RaspberryPiDesktop VM.
Step 13) Booting from GRUB
When prompted by GNU Grub screen, choose “Debian GNU/Linux” then press “Enter”.
It will take some time for the first Raspberry Pi OS boot.
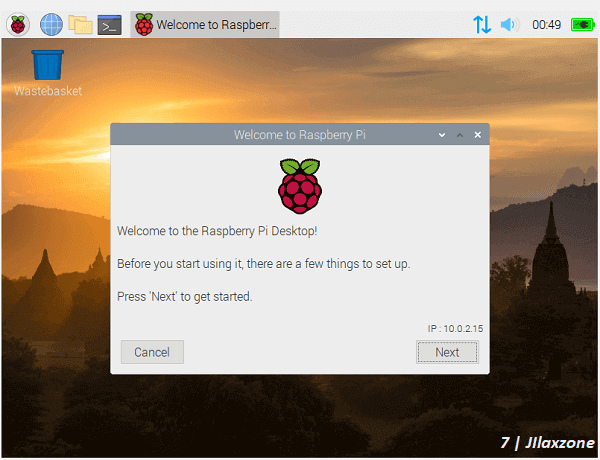
Step 14) Configure Raspberry PI Desktop
Once booted, you’ll be greeted by the “Welcome to Raspberry Pi Desktop”.
14a) Click “Next”.
14b) You’ll be prompted to set your Country, Language and Timezone. Set them according to your preferences. Click “Next”.
14c) You’ll be prompted to set your Password. It’s recommended for you to change your Raspberry Pi Desktop password and not use the default password given. Once set, click “Next”.
14d) You’ll be prompted to update the software. Although it’s recommended for you to update the Raspberry Pi Desktop software, but you can skip it. Click “Skip”.
That’s it. At this stage – if you follow the steps correctly, your Raspberry Pi Desktop OS should be already installed and configured properly as a Virtual Machine on your Computer. Congrats! Now the rest is up to you – either play around with the User Interface, install a new apps or try some of the Raspberry Pi Projects!
Bring it all together
With this Raspberry Pi OS on a VM, at least now you can experience and test the Raspberry Pi OS before finally deciding whether or not you should get the Raspberry Pi actual hardware. While there are plenty of things you can do on the Raspberry Pi OS you have just installed inside the VM, however you can only test mostly software related projects or tweaks. Any hardware related project or tweaks, you may not or will encounter difficulties on simulating them on the Raspberry Pi OS inside a VM. So my recommendation is to get around playing with the Raspberry Pi OS first and test any software related projects / tweaks. Once you finally decided you should get the actual Raspberry Pi hardware, you can use the link below to get yours.
Ready to get the actual hardware?
In case finally you decided to get the actual hardware, here are links to help you getting the Raspberry Pi actual hardware
| Raspberry Pi 400 |  | Get Raspberry Pi 400 on Amazon |
| Raspberry Pi 4B 8GB Starter Kit |  | Get Raspberry Pi 4B 8GB on Amazon |
| Raspberry Pi 4B 4GB |  | Get Raspberry Pi 4B 4GB on Amazon |
Note: If you buy anything from Amazon using any of the links above, I shall earn a small commission at no extra cost charged on your purchases.
Do you have anything you want me to cover on my next article? Write them down on the comment section down below.
Alternatively, find more interesting topics on JILAXZONE:
JILAXZONE – Jon’s Interesting Life & Amazing eXperience ZONE.
Hi, thanks for reading my curated article. Since you are here and if you find this article is good and helping you in anyway, help me to spread the words by sharing this article to your family, friends, acquaintances so the benefits do not just stop at you, they will also get the same goodness and benefit from it.
Or if you wish, you can also buy me a coffee:

Thank you!
Live to Share. Share to Live. This blog is my life-long term project, for me to share my experiences and knowledge to the world which hopefully can be fruitful to those who read them and in the end hoping to become my life-long (passive) income.
My apologies. If you see ads appearing on this site and getting annoyed or disturb by them. As much as I want to share everything for free, unfortunately the domain and hosting used to host all these articles are not free. That’s the reason I need the ads running to offset the cost. While I won’t force you to see the ads, but it will be great and helpful if you are willing to turn off the ad-blocker while seeing this site.