Here’s how to run Android on your iPhone and iPad. No Jailbreak required.
Android is open source, why not fork a version for iOS devices?
Many of you probably ask this, “Why you would want to run Android on your iPhone or even iPad?”
Well, there’s plenty of reasons to do so, and different people may have different reason: be it just for fun, for showing off, for upgrading outdated iOS device with latest Android, or some other reasons, but for me it’s a POC – Proof Of Concept and I’m looking for possibilities where in the near future, Android exclusives can be easily playable on iOS devices (I’m talking something like Emulators and apps/games that existed on Android but not on iOS) or where outdated iPhone or iPad with outdated iOS can be replaced with latest Android – one day someday.
While this is not a real fork of Android for iOS, but at least you get the taste of Android on iOS. I’ll split the section into 2: High level and detail. High level section for you to glance through and for those who are adventurous enough to try on your own, while detailed section, I’ll spell out step by step how I am doing it.
If you are looking to install Windows on iOS, do check my other article here: Running Windows on iOS.
How to run Android on iOS: High level summary
For those who are adventurous and want to figure out the details themselves, you just need to see this high level outline on steps needed to be done to get Android up and running on your iOS device.
But for the rest who needs to get the detailed steps by steps, jump to the next section.
1) Install UTM
2) Get Android image
3) Create and configure a new VM
4) Install Android on the VM
5) Run Android
Article continues below.
Popular on JILAXZONE today:
Here’s the detailed step by step to get Android up and running on iOS
On this trial, I’m using and testing:
- Using iPhone 7 Plus, with A10 Fusion and 3GB RAM
- Testing Android 9.0 and Android 4.4 images
The test results may vary across devices and across Android image version you are using. For better results, it’s highly recommended to use the latest iOS devices (such as the new iPad Pro or the iPhone 11).
The steps below should be pretty much the same for any Android version you are using – so feel free to experiment yourself with different version of Android. Here you go.
1) Install UTM
UTM is like VMWare or VirtualBox on desktop/computer platform, but built for iOS.
Unlike normal apps that appear and listed on Apple App Store, you won’t find UTM on the Apple App Store – reason behind most likely is because Apple A-series chip (such as A13 Bionic) is not (yet) supporting hardware virtualization and Apple doesn’t project its mobile devices (iPhone and iPad) to run Virtual Machines on it – though I highly optimistic soon enough Apple A-series chip would be able to have hardware virtualization built-in – thanks to Apple recent moves, transitioning its Mac OS from Intel-based to ARM-based OS.
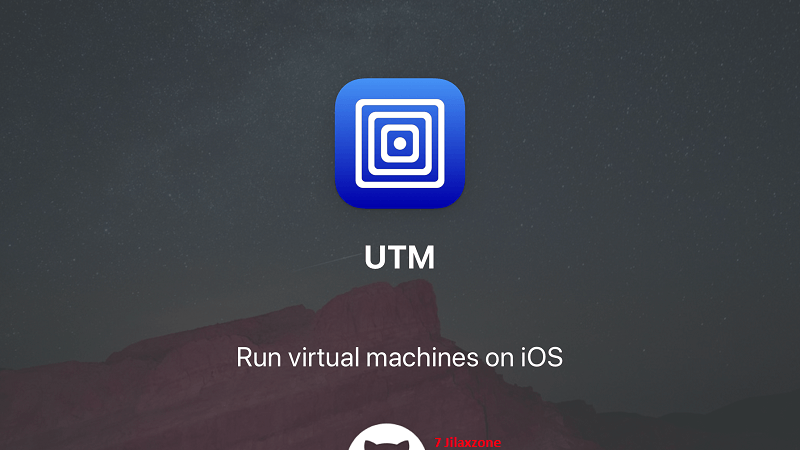
Detailed step by step to download, install UTM, you can find it here: Detailed step by step to install and run UTM.
2) Get Android image
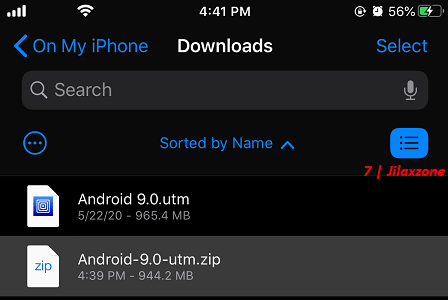
Get the Android image. The easiest is to get it here. Download directly to your iOS device using Safari browser and store it to Files app.
| Android 2.2 | GitHub download link |
| Android 4.4 | GitHub download link |
| Android 9.0 | GitHub download link |
The GitHub download links are courtesy of UTM.
You can also get other Android images from anywhere else (Eg: Android x86 project, download links are here: Android x86 ISO)
3) Create and configure a new Android VM
If you are using the Android GitHub download link above:
You’ll get a pre-configured VM. All you need to do once the Android image is downloaded:
a) Open Files app, navigate to where you download the Android image.
b) Unzip it. Tap on the download file to unzip it.
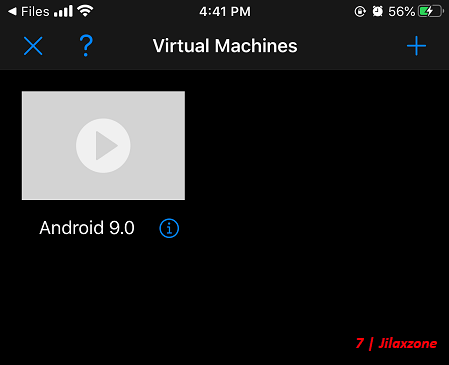
c) Register it to UTM. Once unzipped, tap on the Android image with .utm extension. It will be opened and shown on the UTM app. Proceed to step #4 below.
If you are using other Android images (such as Android x86 in forms of ISO):
Once you have UTM installed on your iOS device and get the Android image on the iOS device (recommended to have it inside Files app), then it’s time to create and configure the new Android VM.
a) Open UTM app.
b) Create a new Android VM. On Create VM window, under Name, give the VM a proper name. On my case, Android x86 VM.
c) Select the Architecture. Under System, tap on Architecture and select the proper one. Eg: If you are using Android x86, choose i386 (x86).
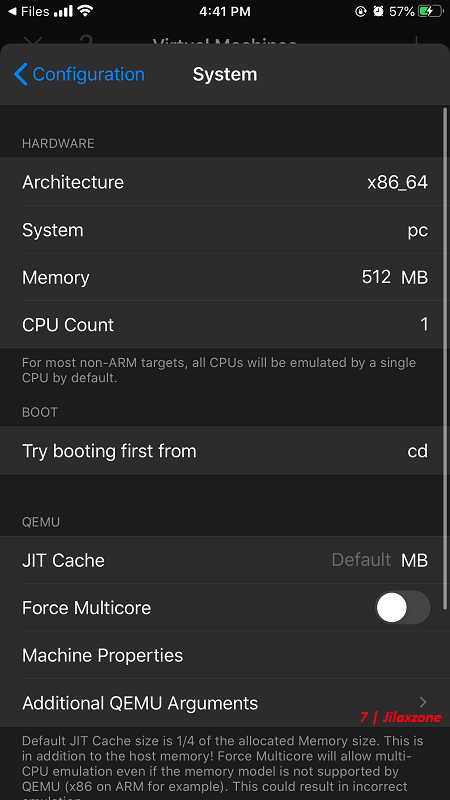
d) Select the Type of Computer. Tap System, leave it to default choice.
e) Configure RAM for VM. Tap Memory, give a decent number of memory/RAM. You can give any value as long as it’s below your iOS total RAM size (Eg: I’m using iPhone 7 Plus with 3GB RAM, I can give up to 1.5GB RAM). Don’t worry, if the VM isn’t running, you can always change this setting later on.
f) Configure Drives. Under Drives, tap on “Setup Drives/Images”. Here we are going to create 2 things: 1 is to create a CD/DVD image and another 1 is to create a hard disk image.
g) Adding Android image. Under Drives/Image, tap on “+”. Tap on “Path”. Tap on “+” and select “Import”. Select the Android image. Then tap on the Android image added. Tap on “Image Type”, select “CD/DVD Image”. Leave the “Location” to default as “ide”. Tap “Back” once done. Now you should see the CD/DVD image pointing to your Android image.
h) Adding Hard Disk image. Under Drive/Image, tap on “+”. Tap on “Path”. Tap on “+”, this time select “Create”. Put the name as “hda.img” (or anything else) and put the size to 10240 MB (depends on Android version image you are using, the newer the bigger the storage). Tap “Save” once done, you should see “Creating disk…” message shown. Then tap on “hda.img” to select it. Tap on “Image Type”, select “Disk Image”. Leave the “Location” to default as “ide”. Tap “Back” once done. Now you should see the Disk image pointing to hda.img.
i) Confirm the setup. If you added both Android image and Hard Disk image properly and correctly, under “Select Image”Drives/Images now you should see both images/drives appearing. Tap on “Create VM” to go back to Create VM window.
j) Ready to create the Android VM. On Create VM window, leave the “Open Configuration after Creation” unchecked, since you can do it later. Tap “Save” to create the VM.
VM Created! Now you should be able to see your newly created VM listed on the UTM Virtual Machines screen. Yay! You’re almost there.
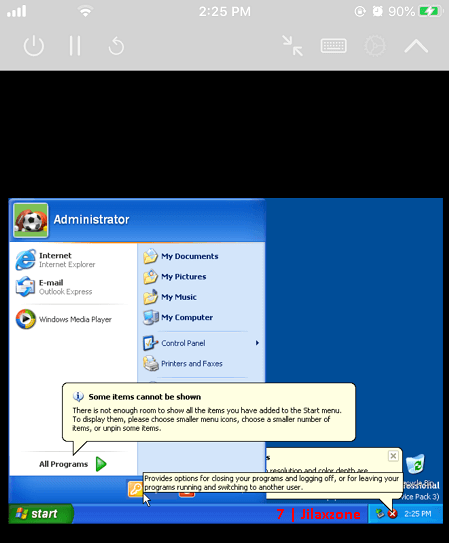
4) Run the VM and Install Android on the VM
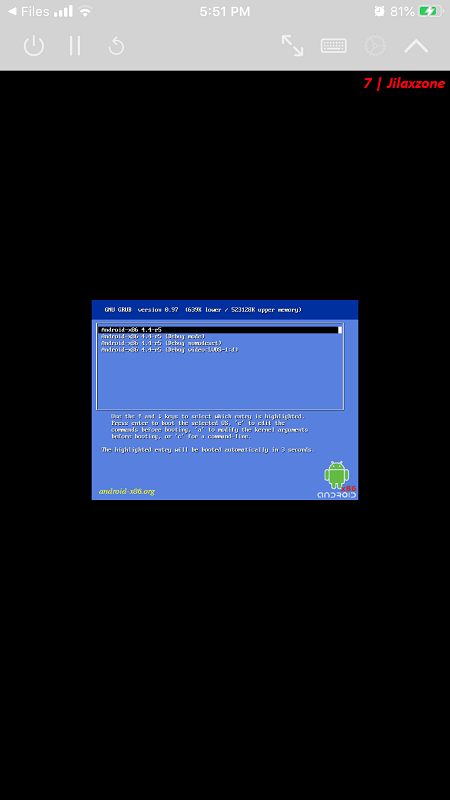
Once the Android VM is created, all you need to do is to tap on the “Play” button. Tap it and your Android VM is run!
If you are using pre-configured VM from GitHub download link above, the Android has been installed too, so you’ll just wait for it to boot. Proceed to step #5.
If you are using other Android images where you configured yourself, after hitting the play button, you will first (and first time only) need to install the Android. Depends on image you are using, but do select on something like “Android xxxxx Installation” to begin the installation – where the “xxxxx” refers to Android image version you are using. And depends on which iOS device you are using, the installation may take sometime to complete.
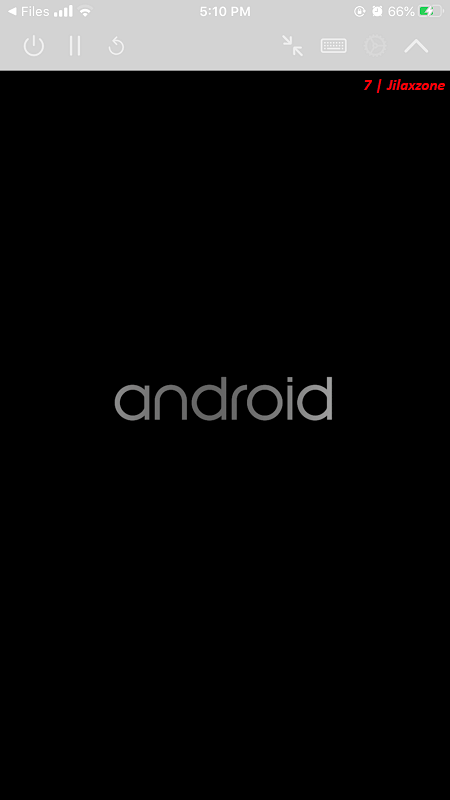
5) Run Android
After (installation process) and booting is done, now you can boot and run Android on iOS device!
Bring it all together
Unfortunately I didn’t record a video to document to whole process, but I took some screenshots as you can see on all the images above.
On my trial, I downloaded Android 4.4 and Android 9.0 from GitHub links above, it took 20-30 minutes to get me into the Android loading screen, I think I should get a newer iOS device to test this out. But nevertheless, my POC is somewhat successful!
Let me know in the comment section below if you have successfully made one for yourself.
Do you have anything you want me to cover on my next article? Write them down on the comment section down below.
Alternatively, find more interesting topics on JILAXZONE:
JILAXZONE – Jon’s Interesting Life & Amazing eXperience ZONE.
Hi, thanks for reading my curated article. Since you are here and if you find this article is good and helping you in anyway, help me to spread the words by sharing this article to your family, friends, acquaintances so the benefits do not just stop at you, they will also get the same goodness and benefit from it.
Or if you wish, you can also buy me a coffee:

Thank you!
Live to Share. Share to Live. This blog is my life-long term project, for me to share my experiences and knowledge to the world which hopefully can be fruitful to those who read them and in the end hoping to become my life-long (passive) income.
My apologies. If you see ads appearing on this site and getting annoyed or disturb by them. As much as I want to share everything for free, unfortunately the domain and hosting used to host all these articles are not free. That’s the reason I need the ads running to offset the cost. While I won’t force you to see the ads, but it will be great and helpful if you are willing to turn off the ad-blocker while seeing this site.


I get a error 2: bad file or directory type when i play the preset VM android 9 on my jailbroken iPhone 6s running on ios 14? Any idea why and how to fix this?
Hi Alfrin,
Ensure you do have enough storage left and RAM left when running the VM inside your iPhone. For RAM especially, since iPhone 6S is having only 2GB of RAM, try to close all the apps and even better to restart the iPhone before opening the UTM app. See if that works for you.
Ciao stavo leggendo questo post veramente molto interessante uso da molti anni software per virtualizzare (sopra tutto VMware) conoscevo anche questo UTM da parecchio ma non essendo mai riuscito a Jailbrekkare in maniera duratura ho sempre abbandonato. A oggi finalmente il jb regge e ho istallato UTM (da Cydia) volevo porvi una domanda ma le iso di sistema operativo sono specifiche o posso usare quelle per istallare tipo su pc da Win XP a 11OS grazie
Hi Rokko,
You can use any ISO to install.
I’ve loaded Android 9.0, 9.0.3 and 4.4 in UTM. However, when I press play on any of them, I get a black screen with a menu bar at the top. Android doesn’t load. Any suggestions? I have an IPhone 12Pro Max with the latest OS.
Hi Bob,
Did you activate JIT / AltJit or Jitterbugs before running the Android?
With android 9 configured to use ARM64, I get the error `QEMU exited from an error: qemu-system: -device ide-hd.bus0ide.0,drive=drive0,bootindex=0: Bus ‘ide.0’ not found`
Could you do this for Ubuntu touch?
Hi Jonathan 🙂
Thanks for taking your time to write this step by step guide. If I understood correctly, the booting took you for Android 9.0 from GitHub links 20-30min. That’s extremely long. I have tried your step by step guide using UTM SE on my iPad in order to access the emulator while I am not connected via WIFI with my computer. However it seems like it takes longer. Have you been able to shorten the waiting time? Do you know another emulator, which works without jailbreak?
Hi Phil,
Unfortunately that’s how it works now. Either to use a better iPad (E.g.: iPad Pro running M2 processor) or use lower version of Android.
Oh, don’t forget to enable JIT from AltStore before running the Android via UTM.
Check out how you can enable JIT here: https://jilaxzone.com/2022/05/11/how-to-use-altjit-altstore-built-in-jit-compiler-on-iphone-the-easy-way-free/
I just see a black screen on my iPhone 14
Hi Cole,
Enable JIT so that it runs faster.