
How to install SideStore and easily sideload apps & games on iOS 26 and iPadOS 26
- This tutorial detailed the steps to install SideStore to enable untethered sideloading of apps.
- No jailbreak nor any forms of subscriptions is required.
- This tutorial though intended for iPhone, but works the same for iPad.
- For other interesting articles, check it out here Raspberry Pi, Linux, Windows, Xbox, PS5, Nintendo Switch, other gaming, iOS, Tech or more at JILAXZONE.
- If you find this article / content inside is already obsolete, do let me know by commenting on the comment section below so that I can update the article to reflect the latest process/news. Thanks.
What is SideStore?
In short, SideStore is your gateway to sideload any apps or games that are not officially available on Apple App Store. SideStore itself is an untethered app sideloader which means you don’t need a computer during sideloading your apps or games or during refreshing your sideloaded apps or games, except during one-time initial setup. Yes, you will still need a computer for the initial setup, during SideStore installation into your iPhone and iPad. Once SideStore is installed on your iPhone or iPad, you can throw-away your computer :).

Great thanks to the people (Joe Mattiello, Jackson Coxson, JJTech, Stern, Joshua Laymon and perhaps bunch of other people) who are making this thing happen (willing to enhance the sideloading methods), now it’s my turn to give back to the community by at least writing this detailed step by step guidelines in a very “beginner” way, so everyone can follow the steps for the untethered sideloading.
In case you want to join/contribute to the community, do check:
| SideStore github page | https://github.com/SideStore |
| SideStore Discord | https://discord.com/invite/WsT2hcwRVy |
This guide is made based on this Reddit my previous post here at JILAXZONE: SideStore – FREE, untethered sideloading. No more Computer required to install & refresh sideloaded app. – JILAXZONE, however it’s now revised and expanded based on the latest iOS 26 and iPadOS 26 requirements and advancements (in sideloading world).
How is SideStore different from AltStore?
Perhaps you keep hearing/seeing SideStore and AltStore and many others solutioning on sideloading. However, the 2 most discussed ones – and totally free – are SideStore and AltStore. Between the two, they are like twin. In fact, SideStore is a direct fork from AltStore. SideStore is then further enhanced to remove the need to have AltServer (or SideServer) and computer turned on while refreshing or installing sideloaded apps.
So after you get the SideStore up and running on your iPhone, you can sort of ditch the AltServer (or SideServer) and your computer because going forward, it will be between you and SideStore only to sideload any apps or games into the iPhone. One caveat though, although computer is no longer required after you get SIdeStore up an running, but to install or refresh sideloaded apps, you still need your iPhone to connect to WiFi.
Here’s what you need
These are the key ingredients you need to get SideStore up and running.

1) iPhone
Here are links to get iPhone case (in case you need):

2) Windows Computer + Keyboard + Mouse
In case you are not running Windows, don’t fret. Do check out the following guidelines to get Windows VM for FREE.
| Windows 10 | Guide to get Windows 10 VM FREE & Official from Microsoft at JILAXZONE |
| Windows 11 | Guide to get Windows 11 VM FREE & Official from Microsoft at JILAXZONE |
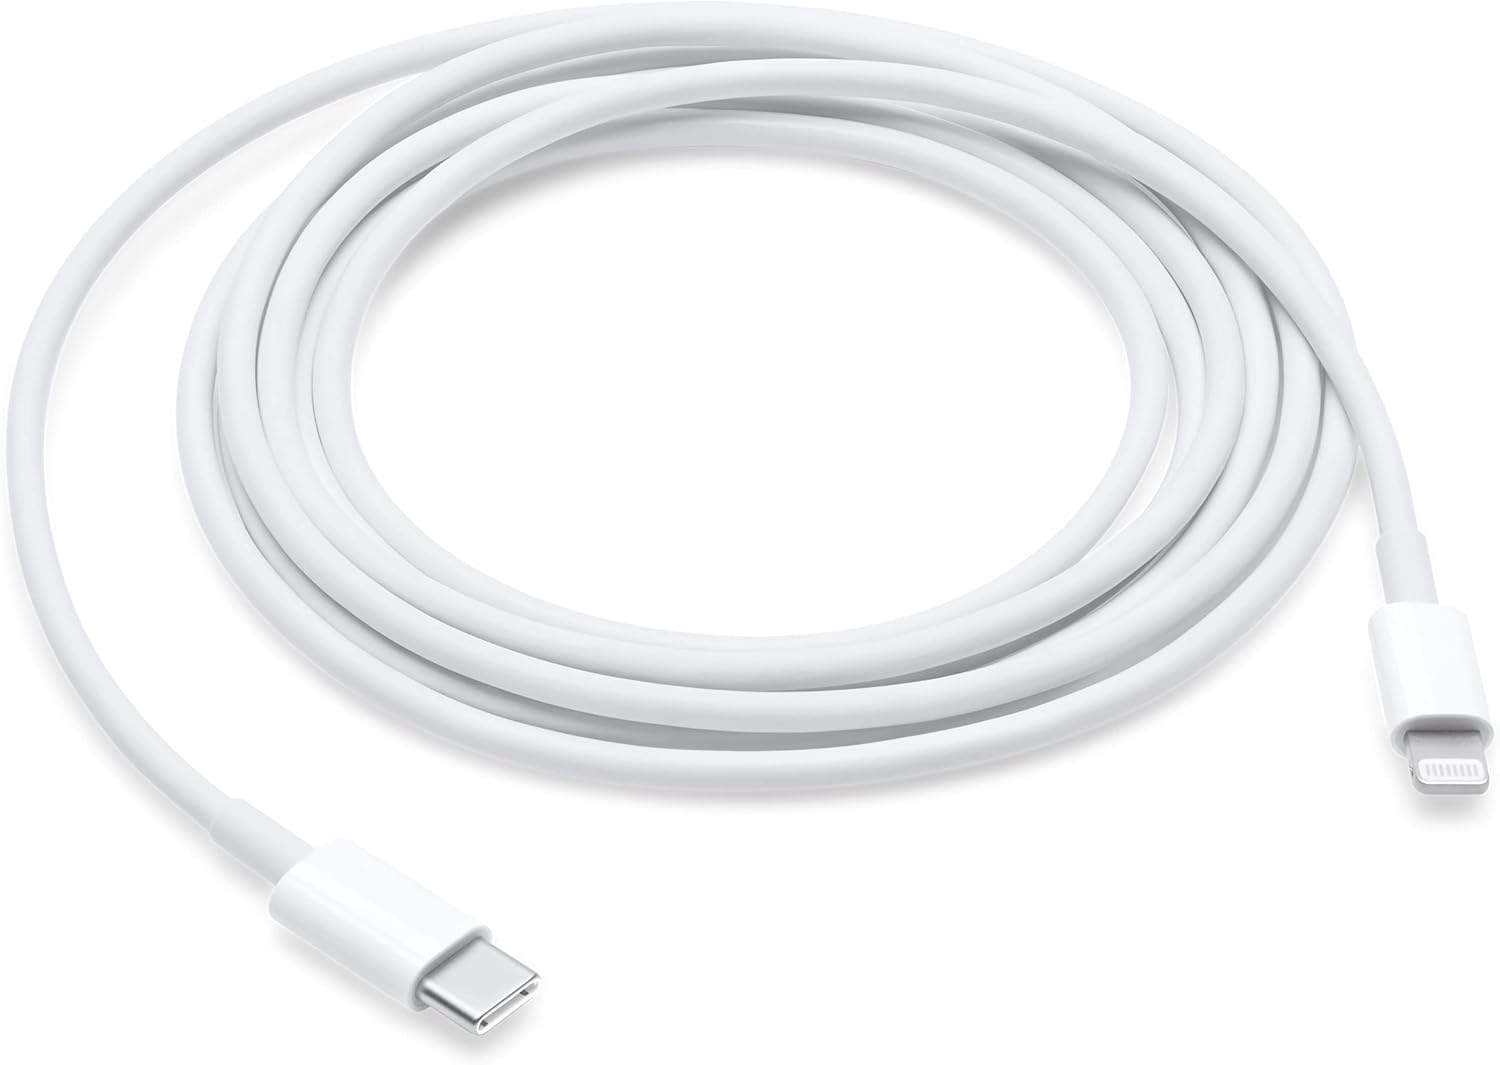
3) Lightning Cable
Here are links to get Lightning cable (in case you need):


4) Internet Connection
5) Your Precious Time (for this one-time setup, around ~1/2 hour)
Ensure you have all of the key ingredients with you before starting.
Note: If you buy anything from Amazon / AliExpress using links above, I will earn a small commission at no extra cost charged on your purchases.
Install, Setup and Use SideStore – High Level Steps
The following are the high level steps going to be done on this detailed step by step guideline. In case you can guess what needs to be done by just looking at the high level steps, feel free to skip the detail steps below.
Step 1) Setup and install SideServer
Step 2) Download JitterbugPair into your Computer
Step 3) Connect your iPhone to your Computer
Step 4) Run JitterbugPair on your Computer and Generate your unique mobiledevicepairing ID
Step 5) Rename JitterbugPair mobiledevicepairing ID into plist on your Computer
Step 6) Download SendAnywhere app on your iPhone
Step 7) Copy JitterbugPair plist file from computer into iPhone via SendAnywhere
Step 8) Run SideServer on your Computer
Step 9) Install SideStore from your Computer into your iPhone
Step 10) Open SideStore app from your iPhone
Step 11) Locate JitterbugPair plist file under SendAnywhere folder inside iPhone Files app
Step 12) Download StosVPN app on your iPhone
Step 13) Open StosVPN app
Step 14) Turn on StosVPN VPN
Step 15) Refresh and Install Sideloaded App(s)
Step 16) Turn off StosVPN VPN
Step 17) Create Reminder to refresh SideStore and sideloaded apps every 6 days (so they don’t expire) on your iPhone
Step 18) Remove SideServer from your Computer
Detailed step by step to install SideStore into your iPhone – Your gateway to sideload any apps or games that are not officially available on App Store.
| The following steps written here have been tested to run successfully on the following environment: a) Latest iPadOS – at the time this article is written is iPadOS 26 Beta and using the iPad that I currently have – iPad 9th Gen. In case you are not on iOS 26 or iPadOS 26 yet, check the link here to get iOS 26 & iPadOS 26: Step by Step updating to iOS 26 and iPadOS 26 today at JILAXZONE. b) Windows 11 – In case you are looking to install Windows 11, check the link here to get them installed: Getting Windows 11 and installing on your Computer at JILAXZONE. Should you are using different version of iOS or iPadOS, the steps may be slightly different but should not deviate too much. Anyway, in case you have questions / issues, feel free to put them down on the comment section down below, I’ll be more than happy to help you. |

The steps below are using the following legends.
| Legends | Description |
|---|---|
| [This is a one time setup] | Means it’s just a one-time setup. You just need to do the step one time only. |
| [This is a repetitive setup] | Means you need to do it again when you need to sideload any application and/or refresh the sideloaded apps. |
Step 1) Setup and install SideServer
[This is a one time setup]
You can skip this step if you have installed SideServer on your computer.
However, if you have not or never install SideServer before, use the link below to install SIdeServer.
| Platform | Download Link |
|---|---|
| SideServer for Windows | https://github.com/SideStore/SideServer-Windows/releases Download the zip file into your computer, extract, run the .msi file and follow the instructions. |
| SideServer for Linux | Follow the instruction here: https://github.com/SideStore/SideServer-for-Linux |
| SideServer for MacOS | https://github.com/SideStore/SideServer-macOS/releases Download the dmg file into your Mac, then install it. |
The rest of the steps are based on SideServer for Windows. However, if you are using different platform, they should be pretty similar.
Step 2) Download JitterbugPair into your Computer
[This is a one time setup]
JitterbugPair is used to get your iPhone unique UDID which needed to sideload your apps.
Check out here for the latest version (in case they have newer version and updates):
| Check latest version | https://github.com/osy/Jitterbug/releases/ |
Click on the “Assets” to get the jitterbugpair-win64.zip.
As an alternative, do check out below for direct link to SideStore version 0.1.1.
| Direct download link | https://github.com/osy/Jitterbug/releases/download/v1.3.1/jitterbugpair-win64.zip |
Step 3) Connect your iPhone to your Computer
[This is a one time setup]
Grab that Lightning cable and plug it to your iPhone and your computer.
Ensure that your iPhone is detected by the computer. Unlock your iPhone and tap on “Trust” when prompted (in case you never plug and/or “Trust” your iPhone to your computer before).
Step 4) Run JitterbugPair on your Computer and Generate your unique mobiledevicepairing ID
[This is a one time setup]
Do the following steps on your computer:
4a) Extract jitterbugpair-win64.zip into any folder (E.g.: D:\JitterbugPair). Let’s call this JitterbugPair folder.
4b) Once extracted, you should see 2 files: jitterbugpair.exe and libwinpthread-1.dll.
4c) Open your command prompt by clicking on Windows, then type “Command Prompt”. Click on Command Prompt to open a new Command Prompt window.
4d) Inside Command Prompt window, navigate to JitterbugPair folder (E.g.: type “cd D:\JitterbugPair” – without the double quotes).
4e) Once Command Prompt has been navigated to JitterbugPair folder, type “jitterbugpair.exe”.
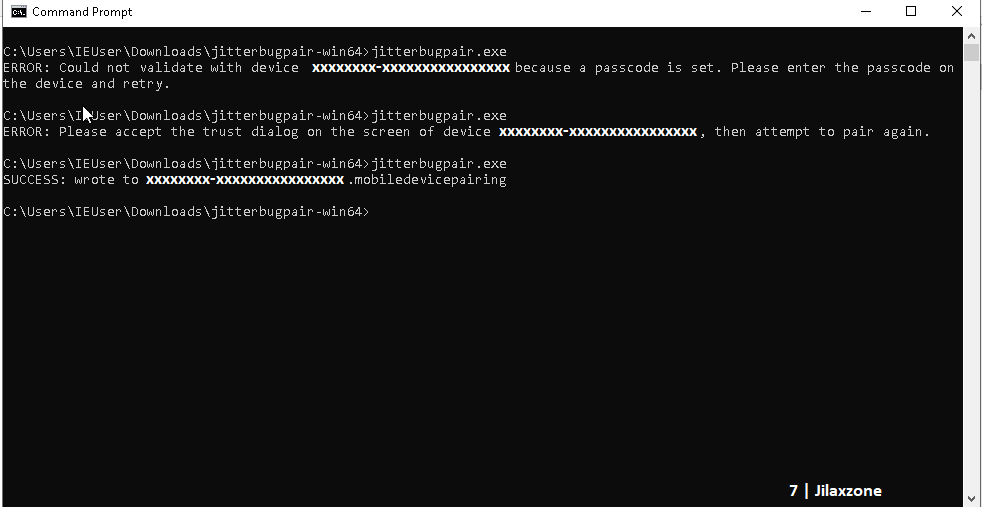
If your iPhone connected correctly to your computer, you should get the following message, “SUCCESS: wrote to XXXXXXXX-XXXXXXXXXXXXXXXX.mobiledevicepairing.” where XXXXXXXX-XXXXXXXXXXXXXXXX is hexadecimal value of your iPhone unique UDID.
Step 5) Rename JitterbugPair mobiledevicepairing ID into plist on your Computer
[This is a one time setup]
Do the following steps on your computer:
5a) From the previous step, check the JitterbugPair folder (E.g.: D:\JitterbugPair).
5b) You should now able to find file like this: XXXXXXXX-XXXXXXXXXXXXXXXX.mobiledevicepairing where XXXXXXXX-XXXXXXXXXXXXXXXX is your iPhone unique UDID.
5c) Rename the file extension from .mobiledevicepairing into .plist. So the final result would be XXXXXXXX-XXXXXXXXXXXXXXXX.plist.
Step 6) Download SendAnywhere app on your iPhone
[This is a one time setup]
SendAnywhere is used for transferring files from computer to your iPhone and vice versa. This is going to be used to transfer the JitterbugPair mobiledevicepairing plist file into iPhone.
| Download link | SendAnywhere on Apple App Store |
Download and install this app to your iPhone. If you have other preference for file transfer app, feel free to replace this app with your preferred file transfer app.
Step 7) Copy JitterbugPair plist file from computer into iPhone via SendAnywhere
[This is a one time setup]
Do the following steps on your computer:
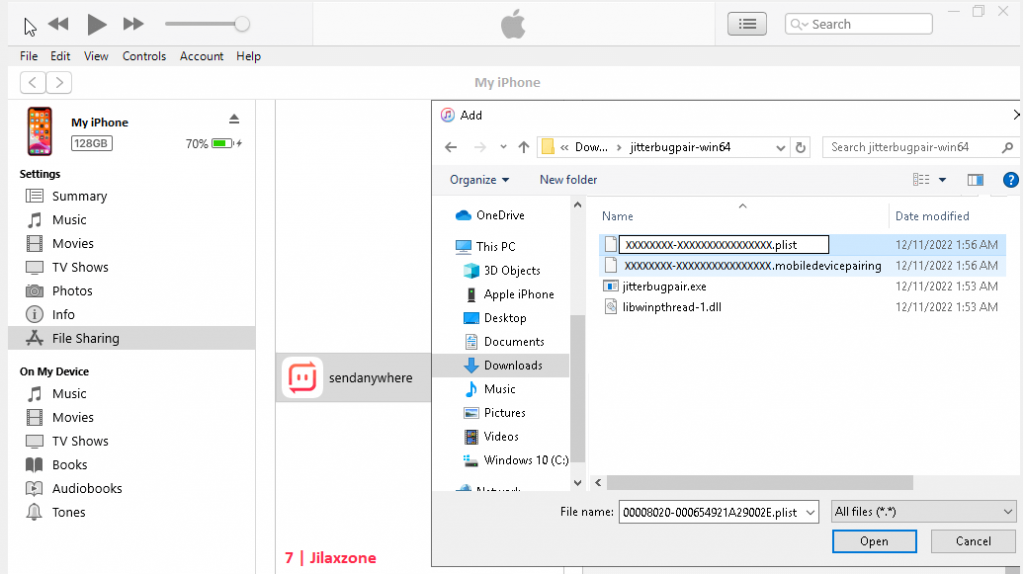
7a) Open browser (E.g.: Chrome).
7b) Open SendAnywhere website, URL: https://send-anywhere.com/.
7c) On SendAnywhere website, click “+”.
7d) Navigate to JitterbugPair folder (E.g.: D:\JitterbugPair) and select the XXXXXXXX-XXXXXXXXXXXXXXXX.plist file, then click “Open”.
7e) Click “Send” and take note of the 6 digit numbers it gives you.
Do the following steps on your iPhone:
7f) Open SendAnywhere app.
7g) Inside SendAnywhere app, navigate to “Receieve” tab and tap on “Input Key”.
7h) Key in the 6 digit numbers you get from SendAnywhere website and tap on “Receive”.
The XXXXXXXX-XXXXXXXXXXXXXXXX.plist will then be transfered from your computer to your iPhone. For now that should be it.
Note: XXXXXXXX-XXXXXXXXXXXXXXXX refers to your iPhone unique UDID.
Step 8) Run SideServer on your Computer
[This is a one time setup]
Do the following steps on your computer:
8a) Click on “Windows” button and type in “SideServer” and click on it.
8b) SideServer will be running on your Windows taskbar. Check for the SideServer icon on your taskbar tray. In case you can’t find the SideServer icon, ensure it’s running by checking on the Windows Task Manager. In case SideServer is running when checked on Windows Task Manager but you can’t find the icon on the Windows taskbar tray, then consider do the following guidelines to enable your SideServer running properly (the guide is written based on AltServer, but the same treatment should work for SideStore as well):
Step 9) Install SideStore from your Computer into your iPhone
[This is a one time setup]
Do the following steps on your computer:
9a) Connect your iPhone into the computer. I would highly recommend you to use the wired method via the USB-C or Lightning cable. Ensure your iPhone is detected by your computer and SideServer is running.
9b) On the Windows Taskbar, click on SideServer icon. You’ll be prompted with various choices from the menu.
9c) Click on “Install SideStore” from the menu then select your iPhone. Make sure your iPhone is in unlocked position. In case you get prompted to trust your device/computer, tap on “Trust” on your iPhone.
9d) In case prompted, key in your Apple Store ID and credential (the same ID that you have registered for FREE Apple Developer account. Just in case you have not registered your Apple ID account as FREE Apple Developer account, check out this guideline on how to do so:
Once SideStore has been successfully installed on your iPhone, you should be able to see the SideStore app icon on your iPhone.
Step 10) Open SideStore app from your iPhone
[This is a one time setup]
Do the following steps on your iPhone:
10a) Open SideStore app.
If prompted by “Untrusted Developer”, tap on “Cancel”. Then go to Settings > General > VPN & Device Management. Under “Developer app” section, check on entry showing your Apple ID used for installing SideStore. Tap on it. Then tap on ‘Trust “<Your Apple ID here>”‘. Then, when you are prompted with ‘Allow Apps from “<Your Apple ID here>”?‘, tap “Allow”. Close Settings and reopen SideStore. This step is required for the iOS to allow you to open SideStore app.
10b) SideStore will prompt you “Pairing File. Select the pairing file for your device…”, tap “OK”.
Continue to the next step.
Step 11) Locate JitterbugPair plist file under SendAnywhere folder inside iPhone Files app
[This is a one time setup]
Do the following steps on your iPhone:
11a) Still inside SideStore app, once you clicked OK, it will open a Files app.
11b) Go into “On My iPhone > sendanywhere” folder to locate the XXXXXXXX-XXXXXXXXXXXXXXXX.plist file.
11c) Tap on the plist file to import it into your iPhone SideStore app.
Note: XXXXXXXX-XXXXXXXXXXXXXXXX refers to your iPhone unique UDID.
Step 12) Download StosVPN app on your iPhone
[This is a one time setup]
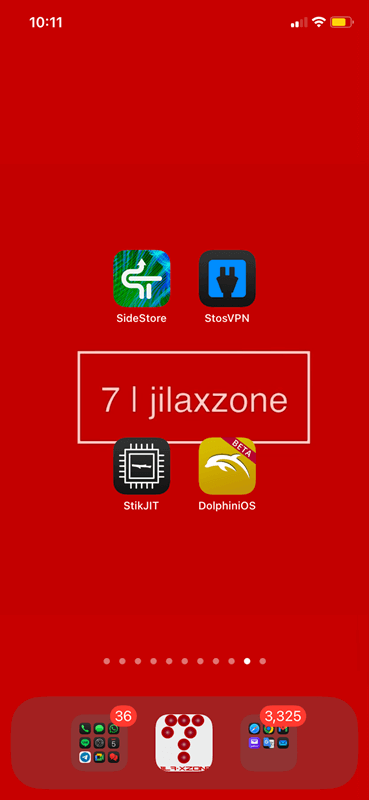
StosVPN is a VPN app developed by the same people who are working in making sideloading works way better every day, the app main usage is to enable loopback VPN for SideStore – sort of trick that makes SideStore connect to a computer while there’s actually no computer connected to your iPhone.
| Download link | StosVPN on Apple App Store |
Download and install this app to your iPhone.
Step 13) Open StosVPN app
[This is repetitive setup]
Tap on StosVPN app from iPhone Home screen to open it.
Step 14) Turn on StosVPN VPN
[This is repetitive setup]
Do the following steps on your iPhone:
14a) Inside StosVPN app, tap on “Connect” to turn on the VPN.
If the VPN turned on successfully, you should be able to see “VPN” logo on the top bar of your iPhone.
Step 15) Refresh and Install Sideloaded App(s)
[This is repetitive setup]
Do the following steps on your iPhone:
15a) Ensure StosVPN VPN is running. If not, go to StosVPN app and turn the VPN on.
15b) Open SideStore app.
15c) Navigate to “My Apps” tab.
15d) Either tap “Refresh All” to refresh the SideStore and all other sideloaded apps or tap on the individual app expiry button to refresh the app.
15e) To install a new sideloaded app, tap on “+” button and locate the .ipa file, the compatible .ipa file will then be sideloaded into your iPhone.
Do note, when compared to AltStore + AltServer, refreshing using SideStore is slower, so be patient!
Step 16) Turn off StosVPN VPN
[This is repetitive setup]
Once you have either refresh the sideloaded app(s) and/or install a new sideloaded app, don’t forget to turn off the StosVPN VPN.
Do the following steps on your iPhone:
16a) Inside StosVPN app, tap on “Disconnect” to turn off the VPN.
If the VPN turned off successfully, you should NOT see the “VPN” logo anymore on the top bar of your iPhone.
Step 17) Create Reminder to refresh SideStore and sideloaded apps every 6 days (so they don’t expire) on your iPhone
[This is a one time setup]
This is important, because if you forgot to refresh SideStore (or any other sideloaded apps or games) within 7 days, then you need to hook-up again with your computer and SideServer and redo the whole process here.
Using a reminder app of your choice, create a reminder every 6 days (yes, every 6 days and not every 7 days), to remind you to refresh SideStore.
Step 18) Remove SideServer from your Computer
[This is a one time setup]
This step is fully optional. After setting up SideStore properly and setting the reminder correctly to remind you to refresh SideStore every 6 days, you won’t need SideServer anymore on your computer, so you can consider uninstall SideServer from your computer.
That’s it. It seems like a very long and troublesome steps, but I can guarantee you while the steps is very long (because I tried my best to detail each and every step), they are not complicated. Congrats for achieving this far!
What you can do with SideStore?
Mainly is to sideload apps without the need of computer.
For my case, since I love Retrogaming, I used SideStore to install various retrogame console emulators. Here they are and their respective guides to install into your iPhone:
| Emulator | Description | Installation guide Link |
|---|---|---|
| CEMU | Nintendo Wii U emulator, workaround for iOS | CEMU workaround for iOS at JILAXZONE |
| Delta | Multiple Nintendo console emulator for iOS | Delta for iOS at JILAXZONE |
| eNGE | PS1 emulator for iOS | eNGE for iOS at JILAXZONE |
| iNDS | NDS emulator for iOS | iNDS for iOS at JILAXZONE |
| PPSSPP | PSP emulator for iOS | PPSSPP for iOS at JILAXZONE |
| Provenance | Multiple game console emulator for iOS | Provenance for iOS at JILAXZONE |
| RetroArch | Multiple game console emulator for iOS | RetroArch for iOS at JILAXZONE |
| RetroGameBot | Multiple game console emulator runs on Safari for iOS | RetroGamesBot for iOS at JILAXZONE |
| Yuzu | Nintendo Switch emulator, workaround for iOS | Yuzu workaround for iOS at JILAXZONE |

Some of the sideloaded apps or games do require JIT to be enabled. Nowadays, there’s an easy way to enable JIT on your iPhone and iPad – although at the time this article is written, JIT is not available/not working yet for iOS 26 and iPadOS 26, but worth reading. Here it is: StikDebug – the easiest JIT enabler for your iPhone and iPad at JILAXZONE.
Bring it all together
What a wonderful works done by the community, now with SideStore, practically there’s no more computer and SideServer required. If you follow the steps correctly, by now, you should be able to sideload any apps and/or refresh anywhere and anytime you like – without the need of computer and SideServer. Enjoy sideloading! In case you encountered any difficulties and/or have queries, don’t hesitate to put your queries or thoughts on the comment section down below. I’ll be happy to assist.

Do you have anything you want me to cover on my next article? Write them down on the comment section down below.
Alternatively, find more interesting topics on JILAXZONE:
JILAXZONE – Jon’s Interesting Life & Amazing eXperience ZONE.
Hi, thanks for reading my curated article. Since you are here and if you find this article is good and helping you in anyway, help me to spread the words by sharing this article to your family, friends, acquaintances so the benefits do not just stop at you, they will also get the same goodness and benefit from it.
Or if you wish, you can also buy me a coffee:

Thank you!
Live to Share. Share to Live. This blog is my life-long term project, for me to share my experiences and knowledge to the world which hopefully can be fruitful to those who read them and in the end hoping to become my life-long (passive) income.
My apologies. If you see ads appearing on this site and getting annoyed or disturb by them. As much as I want to share everything for free, unfortunately the domain and hosting used to host all these articles are not free. That’s the reason I need the ads running to offset the cost. While I won’t force you to see the ads, but it will be great and helpful if you are willing to turn off the ad-blocker while seeing this site.