iPhone Tip: Workaround Fix for AltServer icon doesn’t show on Windows 11 taskbar | AltStore | Sideloading
TL;DR:
AltServer icon does not appear on Windows 11 taskbar, the workaround fix is to install Windows 10 VM inside Windows 11, since anyway AltStore runs great on Windows 10. Check out the detail steps below.
A little bit of Background
I didn’t know when this (AltServer icon is no longer showing on Windows 11 taskbar) happened, but when I recently would like to reinstall my AltStore (after no longer using it for 3-4 months), it happened – the AltServer icon is no longer showing on Windows 11 taskbar. Google here and there, found out some Reddit threads saying, the issue appears only to those using Windows 11 insider build and to install Explorer Patcher. I did install it and it caused my Windows 11 taskbar to crash and my Windows to show nothing but blank black screen.
So, if you are here to find out the cure / fix for AltServer icon doesn’t show on Windows 11 taskbar, my recommendation would be not to install Explorer Patcher – at least until it gets fixed and doesn’t cause Windows 11 taskbar to crash. If so happened you install Explorer Patcher and your Windows is now having blank/black screen/crash, check out here for the fix: https://jilaxzone.com/2022/12/05/windows-tip-heres-how-to-fix-for-explorer-patcher-causing-taskbar-to-crash/
Instead, my recommendation is for you to do the following steps.
Here’s what you need
These are the key ingredients you need to get AltServer working (again) on your Windows computer.
a) iPhone
b) Computer running Windows (in this case Windows 11)
c) Lightning cable
Here are links to get Lightning cable (in case you need):


d) Computer Hard disk Storage ~27GB
Here are links to get HDD & SSD (in case you need additional storage):
 | SAMSUNG SSD T7 Portable External Solid State Drive 1TB USB 3.2 Gen 2 on Amazon |
 | Seagate Portable 2TB External Hard Drive HDD — USB 3.0 on Amazon (Cheaper option) |
e) Internet connection
Here’s the workaround fix to use AltStore on Windows 11 (via Windows 10 VM)
Why this is a workaround fix – mainly because there’s no straight-away-and-easy fix. Either Microsoft needs to fix its Windows 11 (insider) build or AltServer must be updated to follow latest Windows 11 build, either way, since currently we are all waiting for either Microsoft or AltStore team to make a move, I’m sharing with you what I have done to make AltServer working within Windows 11 – using the following workaround fix: which is to install Windows 10 VM on Windows 11.
In case you have a better working solution and willing to share, please do share on the comment section below – I’ll incorporate the working fix on my future post.
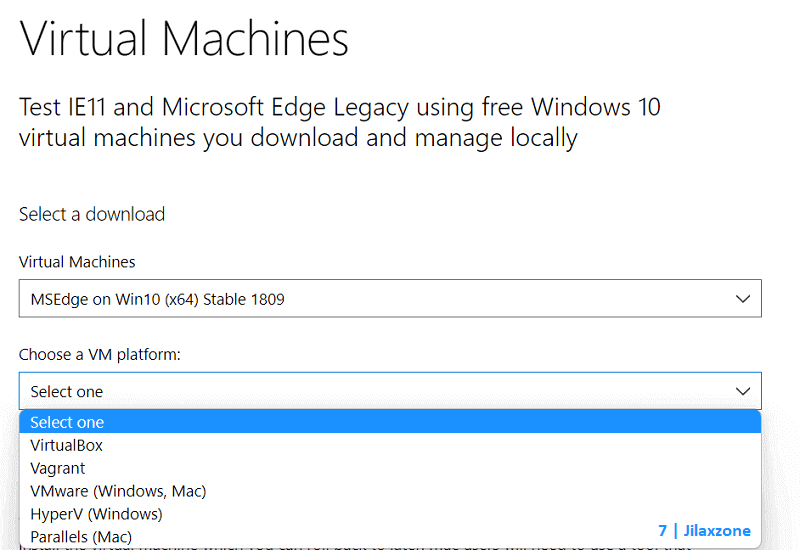
1) Download official Windows 10 VM from Microsoft
Microsoft is giving official Windows 10 VM for free. Check out how you can get it for free too here:
Detail steps here:
Prepare about ~27GB in your computer storage, since the Windows 10 VM is about 7GB when you download it and ~20GB when you expand it on VM application. Just in case you already have a Windows on VM or any other Windows computer (E.g.: Your sibling, your parents, your kids, your friends PC), you have the option to use them – so you don’t need to download this Windows 10 VM.
However should you continue forward to download the Windows 10 VM, if you are like me, choosing the VirtualBox version, the downloaded filename would be something like this: MSEdge.Win10.VirtualBox.zip.
2) Download and install the VM application (My recommendation would be VirtualBox)
Next step is to download and install the VM application. My recommendation is to use VirtualBox since it’s free and open source.
| Download link | https://www.virtualbox.org/ |
Once downloaded, double click the exe to start the installation. Follow the on-screen instruction to install VirtualBox.
The subsequent steps would be based on VirtualBox.
3) Configure VM
Once you have downloaded the Windows 10 VM and you have installed the VM application (VirtualBox), do the following:
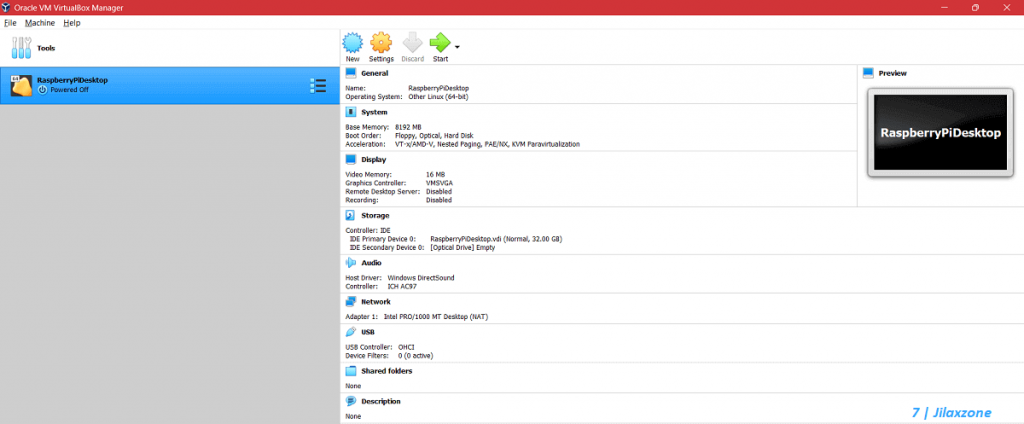
3a) Unzip the MSEdge.Win10.VirtualBox.zip. You’ll get MSEdge – Win10.ova file.
3b) Double click the MSEdge – Win10.ova file. It will open Virtual Box application and start importing the Windows 10 VM. You’ll see the size expanded from 7GB into roughly ~20GB.
Once importing is done, you’ll see the Windows 10 VM is ready (If you don’t change the name, it would be named as “MSEdge – Win10”). Although the Windows 10 VM now is ready, but don’t start it yet. Follow the next steps.
4) Download and Install VirtualBox Extension Pack
Extension pack allows the Windows 10 VM to have USB 2.0 virtual port – important for your iPhone to be connected and detected by the Windows 10 VM. Download using the following links.
| VirtualBox 6.1 Extension Pack download link | https://download.virtualbox.org/virtualbox/6.1.40/Oracle_VM_VirtualBox_Extension_Pack-6.1.40.vbox-extpack |
| VirtualBox 7.0 Extension Pack download link | https://download.virtualbox.org/virtualbox/7.0.4/Oracle_VM_VirtualBox_Extension_Pack-7.0.4.vbox-extpack |
Once downloaded, double click the extension pack file to start updating the VirtualBox. Follow the on-screen instruction.
5) Plug in your iPhone to computer
Using the lightning cable, plug the cable to both your iPhone and computer. Ensure your iPhone is detected by your computer. On your iPhone, tap on “Trust” when prompted to trust the computer.
6) Setup USB 2.0 inside VirtualBox
Follow these steps:
6a) Click on the Windows 10 VM (“MSEdge – Win10”) on the VirtualBox app.
6b) Click on “Settings”.
6c) Under Settings, go to “USB”.
6d) Inside USB screen, tick “Enable USB Controller” then choose “USB 2.0 (OHCI + EHCI) Controller”.
6e) Still inside USB screen, click on “+” icon and choose “Apple Inc iPhone” from the list. In case you can’t see the iPhone from the list, that means your iPhone has not been detected by your computer – try unplug and plug back.
6f) Click “OK”.
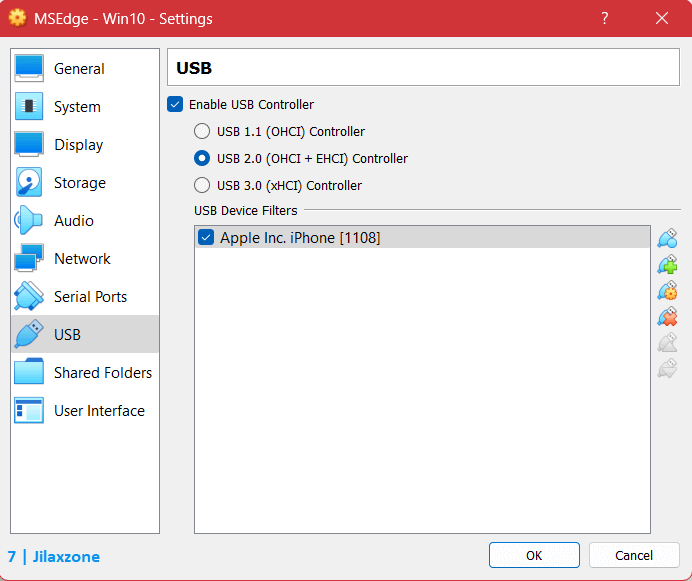
You have just finished setting up USB 2.0 inside the Windows 10 VM. iTunes and iPhone require at least USB 2.0 for the iPhone to be able to connect to the computer and detected by the iTunes.
Article continues below.
Popular on JILAXZONE today:
7) Start the Windows 10 VM
Follow these steps:
7a) Click on the Windows 10 VM (“MSEdge – Win10”) on the VirtualBox app.
7b) Click on “Start”.
7c) When prompted by Use Account Control, click “OK”/”Yes”.
If this is your first time booting the Windows 10 VM, it will take some time, so be patient.
If everything goes smooth, you’ll be presented with the Windows 10 Login window.
8) Key in Windows 10 Credential
Since we are using the official and free Windows 10 VM from Microsoft, it comes with the standard user: “IEUser” and standard password: “Passw0rd!”. When keying in the password, don’t include the double-quotes. Welcome to Windows 10!
9) Download and Install iTunes
Do not use iTunes that comes from Microsoft Store, instead using the link below to download iTunes directly from Apple.
| iTunes for Windows 64-bit download link | https://www.apple.com/itunes/download/win64 |
| iTunes for Windows 32-bit download link | https://www.apple.com/itunes/download/win32 |
Once downloaded, double click the exe file to start the iTunes installation. Follow the on-screen instruction.
10) Restart Computer
At the end of iTunes installation, it will ask you to restart your computer. Do restart it.
11) Open iTunes & Plug iPhone and trust the computer
Once computer restarted, do the following steps:
11a) Ensure your iPhone is still plugged in to the Windows 10 VM and ensure you have “trusted” the computer (unlock your iPhone and tap on “Trust” when prompted).
11b) Then open the iTunes.
11c) Ensure your iPhone is detected by the iTunes.
This step is important, making sure that your iPhone is recognized by the iTunes (AltServer requires the iPhone to be first detected by the iTunes).
12) Download and Install AltServer on Windows 10 VM
Follow these steps:
12a) Inside Windows 10 VM, open the browser (E.g.: Edge).
12b) Open AltStore website
| Download link | https://altstore.io/ |
12c) Download AltServer by clicking on the “Windows” button.
12d) Once downloaded, double click the exe file to start the AltServer installation. Follow the on-screen instruction.
13) Run AltServer on Windows 10 VM
Follow these steps:
13a) Once AltServer has been installed to the Windows 10 VM, click on “Windows”.
13b) Key in “AltServer” and click on it.
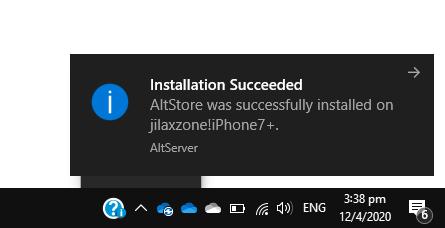
AltServer will now run inside the Windows 10 VM. To check it out and to be sure, see the taskbar, whether you can see the AltStore rectangle icon. If you can see it, then congrats, you managed to install the AltServer and get it working!
14) Re-Install / Refresh AltStore into your iPhone via Windows 10 VM
Now since AltServer has been running, next step is for you to either refresh your AltStore (if it’s not expired) and/or re-install your AltStore (if it has expired).
Follow these steps:
14a) Left click on AltServer rectangle icon located on Windows 10 VM taskbar.
14b) Click on “Install AltStore” and choose your iPhone.
Follow the on-screen instruction. In case AltServer prompts you to install iCloud, do install it – because it’s a required component needed by the AltServer.
Bring it all together
At least this is the way I can do without ruining my Windows 11 and until either AltStore team or Microsoft has a fix for AltServer icon does not appear on the taskbar. Enjoy sideloading! In case you encountered any difficulties and/or have queries, don’t hesitate to put your queries or thoughts on the comment section down below. I’ll be happy to assist.

Do you have anything you want me to cover on my next article? Write them down on the comment section down below.
Alternatively, find more interesting topics on JILAXZONE:
JILAXZONE – Jon’s Interesting Life & Amazing eXperience ZONE.
Hi, thanks for reading my curated article. Since you are here and if you find this article is good and helping you in anyway, help me to spread the words by sharing this article to your family, friends, acquaintances so the benefits do not just stop at you, they will also get the same goodness and benefit from it.
Or if you wish, you can also buy me a coffee:

Thank you!
Live to Share. Share to Live. This blog is my life-long term project, for me to share my experiences and knowledge to the world which hopefully can be fruitful to those who read them and in the end hoping to become my life-long (passive) income.
My apologies. If you see ads appearing on this site and getting annoyed or disturb by them. As much as I want to share everything for free, unfortunately the domain and hosting used to host all these articles are not free. That’s the reason I need the ads running to offset the cost. While I won’t force you to see the ads, but it will be great and helpful if you are willing to turn off the ad-blocker while seeing this site.